

As more of our USA-based clients are needing to meet 508 compliance in the virtual world, they often know the label, but don’t know the tangible steps of how to get there. The instructions below show clients how to hands-on remediate their PDFs to meet 508 compliance. It’s a good starting place, as you evaluate if this is something you want to remediate in-house or to outsource. These instructions can also help you ask questions from the vendors who generate PDFs for you. You’ll be equipped to ask your vendors to create PDFs that are 508 compliant from the origin point.
Table of Contents
- Why Make PDFs Accessible?
- What to Test for?
- Before You Open a PDF for Remediation
- Testing
- Advanced Remediation
Established in October 2012, experts from several federal agencies created the AED COP (Accessible Electronic Document Community of Practice).
Why Make PDFs Accessible?
Not everyone is able-bodied.
Having a digitally accessible document allows people with low vision, blindness, dyslexia, colour blindness, or illiterate people use a screen reader, to read your offered PDFs. Posting a PDF to your portal will not transform or improve your document; you must test and remediate PDFs manually before uploading them to the web portal if you want to meet WCAG 2.2 AA and Section 508 standards. Depending on your user base, your clients, members, or your own staff may need ADA accommodations to perform their needed functions on the portal.
Think of a remediated PDF as the digital equivalent of a braille alternative print document, but helpful for more use cases than just for a person that is legally blind.

What to Test for?
- Sensory Characteristics
- Content Layer
- Tag Layer
- Logical Reading Order
- Adobe’s Built in Accessibility Checker
Before You Open a PDF for Remediation
Review the Official Section 508 Materials
- Training Videos: https://www.section508.gov/create/pdfs/ PDF Training Videos | Section508.gov
- PDF Testing Checklist (DOCX) – https://assets.section508.gov/assets/files/PDF-Printable-Accessiblility-Checklist.docx
- PDF Testing and Remediation Guide (DOCX) – https://assets.section508.gov/assets/files/PDF Testing and Remediation Guide-Adobe Acrobat DC Pro-AED COP.docx
Analysis – Do You Need a PDF?
PDFs may be useful for quickly sharing information and locking in the visual appearance of the document, but they are not as easy to view on a mobile device as an HTML page. Before authoring a lot of PDFs, stop to think if you really need a PDF to communicate the information you want to share. Can that information be shared in an HTML format? If so, use HTML.
“PDFs are still used across government, but they are often not the most accessible or mobile-friendly option. Federal policy requires agencies to prioritize HTML and use PDFs only when necessary. Choose formats that support accessibility, responsiveness, mobile-friendliness, and a digital-first user experience.”
-Section508.gov
Start with Well Planned Source Documents Before Formal 508 Remediation Begins
Before you get started testing, make sure you make your task of making your documents accessible as easy as possible by starting off with a well-planned source document.
The tags that a screen reader looks for in a PDF are equivalent to concepts of basic HTML:
- Heading 1,
- Heading 2,
- Heading 3,
- Heading 4,
- Heading 5,
- Paragraph,
- Table Data,
- Data Cell,
- Table Row,
- Table, Figure.
There are about 37 possible tags (elaborated on later).
Examples of PDFs that Likely Don’t Meet Section 508 Out of the Box
- Not Compatible: A document that was printed, distorted, and scanned.
- Advice: Find the original digital copy of the file if possible; this will save you headache when remediating the PDF.
- Not Compatible: A handwritten note that was photographed and placed into a PDF.
- Advice: See if you can type an equivalent digital copy of the document, if the handwriting nature is not essential to the substance of the document. If that is not possible, know that you will have to take extra care to remediate the PDF.
- Not Compatible: A highly artistic document with manually drawn typography.
- Advice: Know that you will have to take extra care to remediate the PDF.
Microsoft Word
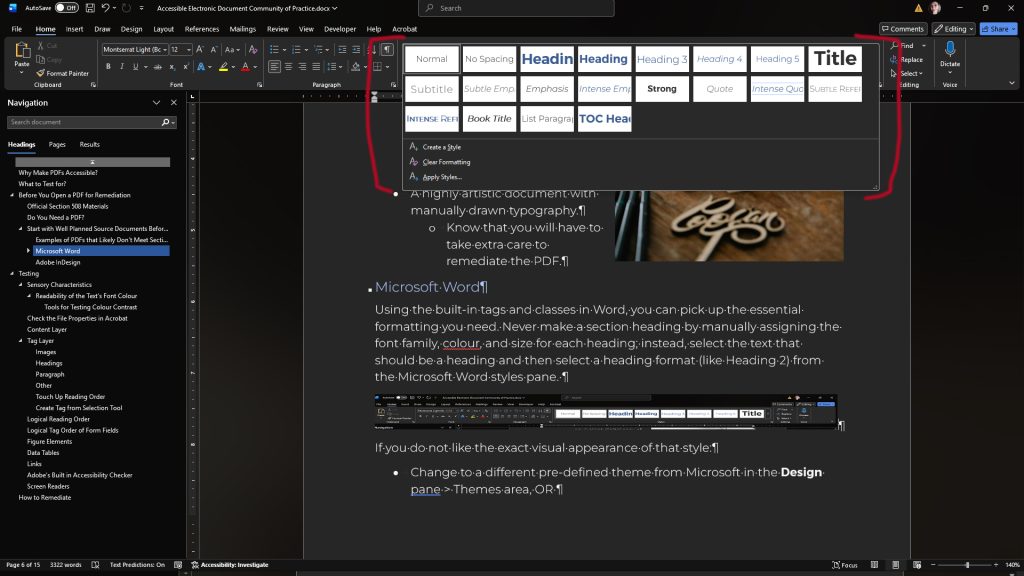
Using the built-in tags and classes in Microsoft Word, you can pick up the essential formatting you need. Never make a section heading by manually assigning the font family, colour, and size for each heading; instead, select the text that should be a heading and then select a heading format (like Heading 2) from the Microsoft Word Styles pane.
If you do not like the exact visual appearance of that style:
- Change to a different pre-defined theme from Microsoft in the Design pane > Themes area,
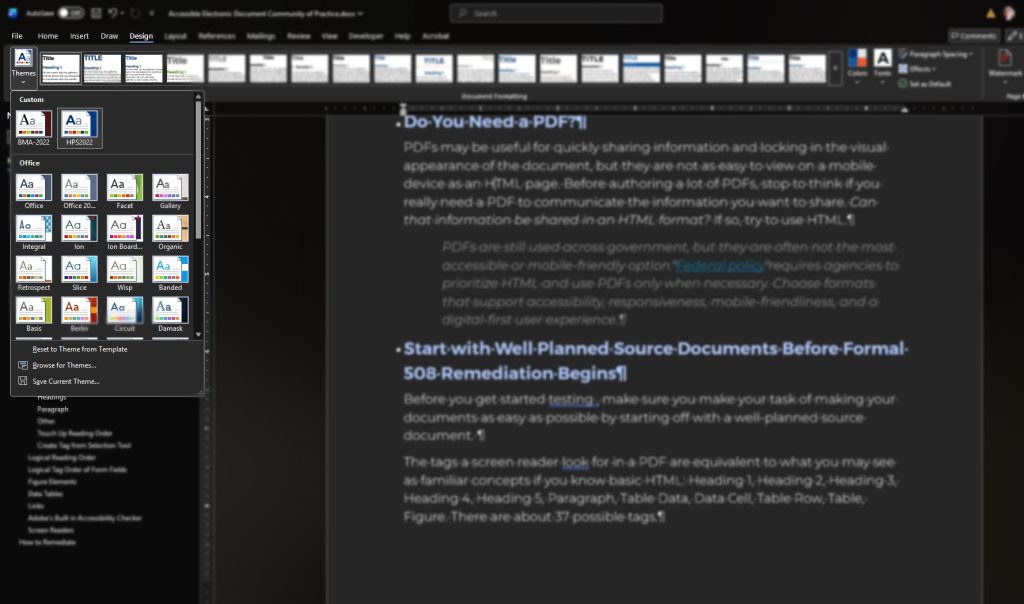
OR - Create your own custom theme (Design pane > Themes area), colour pallet (Design pane > Colors area), or Font-pack (Design pane > Fonts area) where you define the primary font for headings and primary font for the body text. This is the best place to assign your designer-font here, and let that font definition cascade down to other choices of the document; if you find later that you need to change the font, change it again at this top-starting point for your convenience.
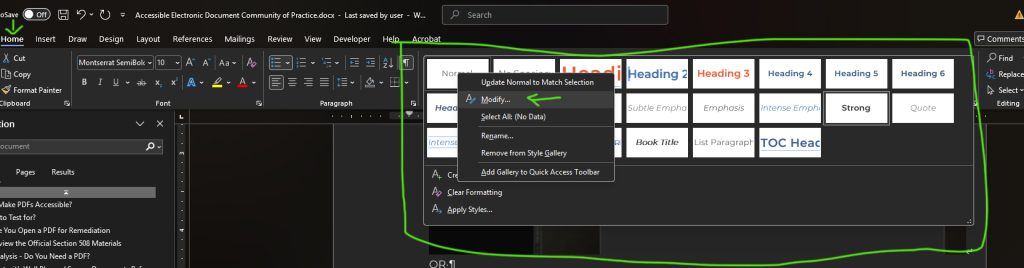
- You can further assign a custom font face, font size, colour, line-height, kerning, border, or any other style property directly on the style. Right-click on the style and make your adjustments in the Home Pane > Styles Section >Modify pop-up.
- You can further assign a custom font face, font size, colour, line-height, kerning, border, or any other style property directly on the style. Right-click on the style and make your adjustments in the Home Pane > Styles Section >Modify pop-up.
When you are done with the content authoring of your future PDF:
- Use the Acrobat pane and click on the Preferences button to see the options available to you when converting the document to a PDF. Selecting the best options here will reduce your workload in the remediation process when working on Adobe Acrobat; your output PDF will likely be 90% accessible. Generally, you will want to select Create Bookmarks, Add Links, Enable Accessibility and Reflow with tagged Adobe PDF.
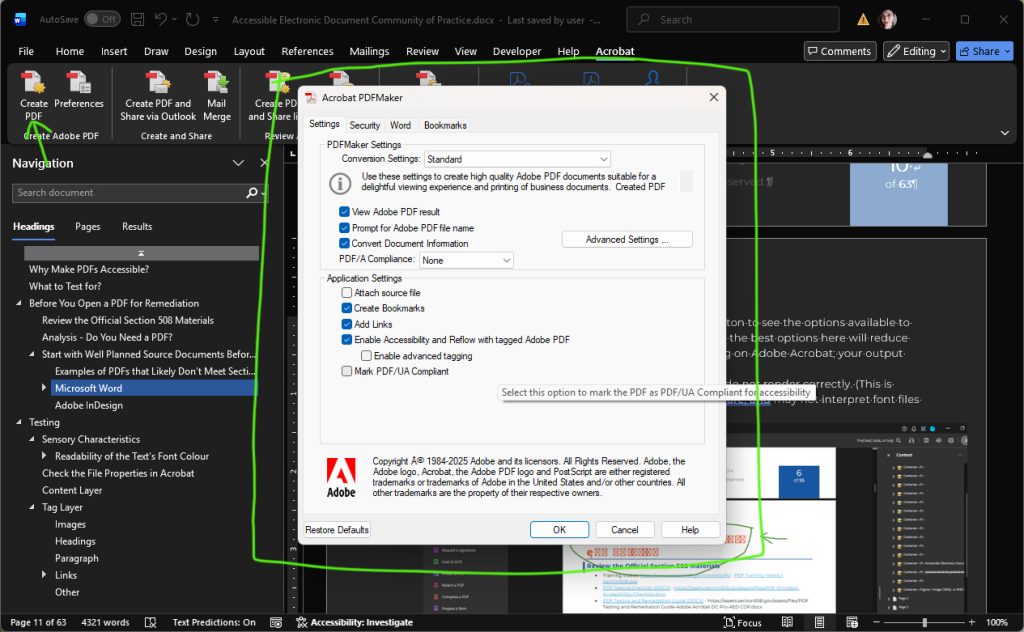
Settings Tab
- Check Convert Document Information
- PDF A Compliance: None
- Check Create Bookmarks
- Check Add Links
- Check Enable Accessibility and Reflow with tagged Adobe PDF
Go to the Advanced Settings
- Compatibility: Select the Latest Version Presented to You, preferably at least Acrobat 8.0 (PDF 1.7)
- Apply your preferences and close that window.
- Click the Create PDF button.
- A prompt will open asking for your file name. Type in your desired file name. Click the Save button.
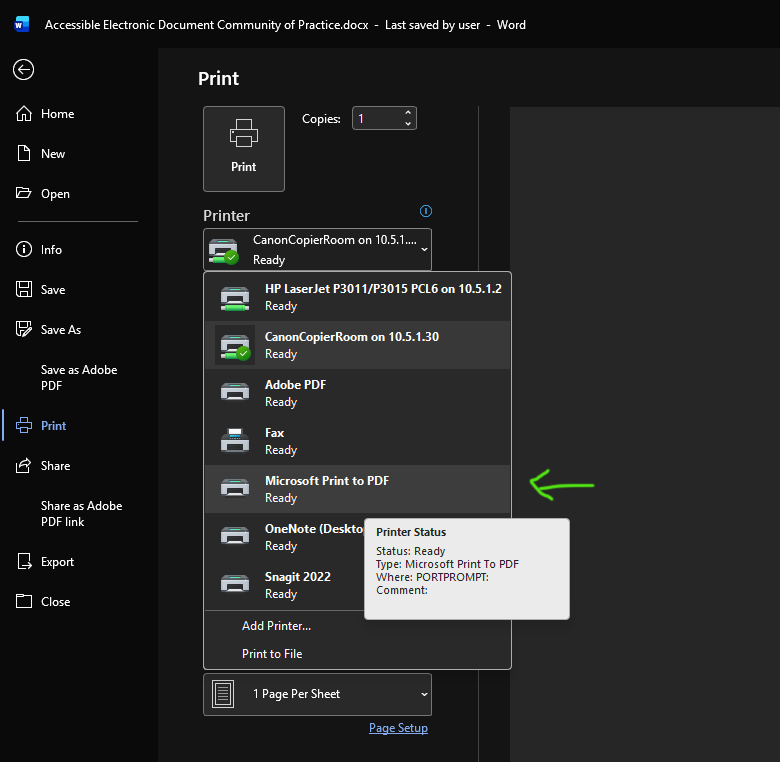
- Occasionally, fonts exported through the Acrobat pane do not render correctly. This is because Word is a word processor (not design software) and may not interpret font files properly.
In these cases, try selecting File > Print > Microsoft Print to PDF.
This is also an option if you don’t have Adobe Acrobat installed on your computer or if an Admin disabled the Acrobat pane on your computer; you may not be able to benefit from some of the rich accessibility options from that specific Acrobat pane.
Adobe InDesign
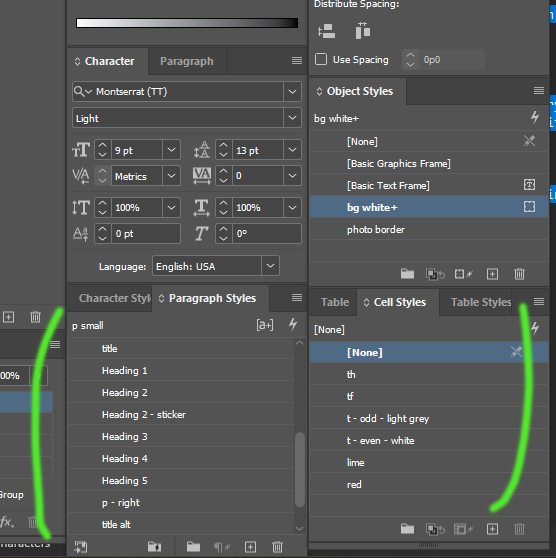 Instead of manually assigning a font family, size, colour, line-height individually to each piece of text in your layout, opt for using the Paragraph Styles tool in Adobe InDesign. For your convenience, create paragraph styles like, “Heading 1, Heading 2, Heading 3, Heading 4, paragraph, unordered list, ordered list, ordered list > 2nd level.” Create Character Styles for pieces of text in the middle of a paragraph, that need additional styling; suggested style names could be, “strong,” “emphasis.”
When style up your paragraph styles, make sure to review the options in the Paragraph Styles dialog to define how the style should be exported in terms of content hierarchy to a PDF.
Testing
Open Your PDF in Adobe Acrobat.
- If your file is a native PDF, simply click on the file to open it on your computer.
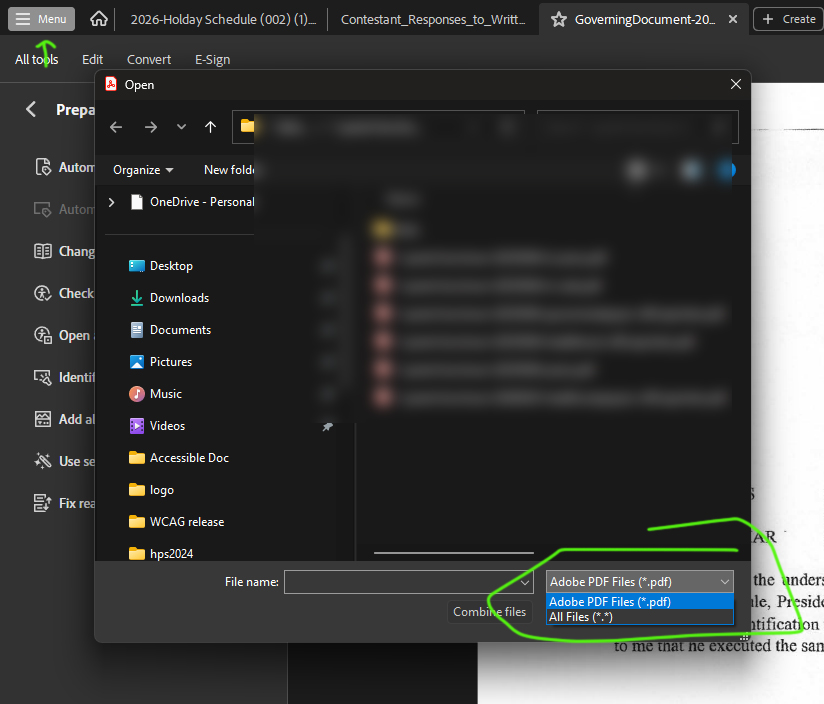
- If you are trying to convert a file, like a Microsoft Word File to a PDF, you can open Adobe Acrobat, go to Menu > Open and find the Word Document, so that Adobe Acrobat can try to open the file as a PDF. (You may have to opt to show all file types, instead of filtering to only Adobe PDF file types).
Sensory Characteristics
 Before looking at any non-visual or background/meta data of the file, look at the design itself.
- Does the design rely solely on sensory characteristics to communicate data?
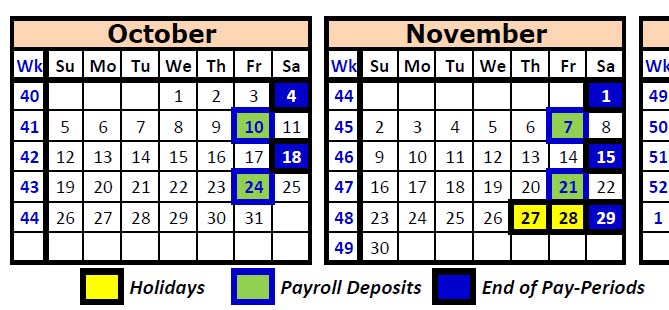
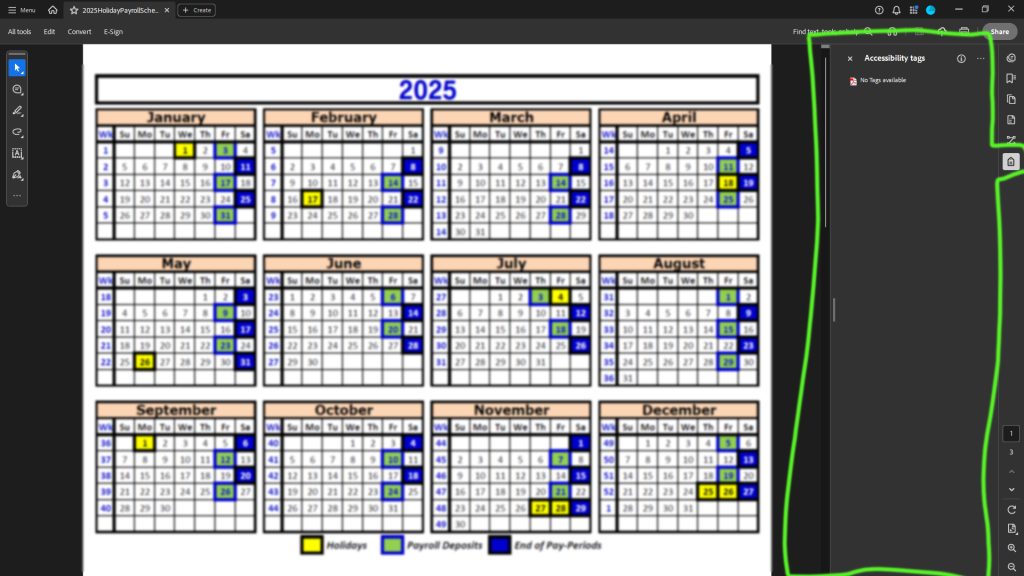
- Does it have a status pie chart that relies on the colour red to show incomplete, yellow to show in-progress, and green to show completed… while solely relying on colour to communicate and not including a supporting text-based supplementary label?
- This may confuse people not familiar with your colour coding system and may not be useful to someone who is colourblind. Additionally, a blind person won’t be able to interpret colour differences without supportive labeling.
- Does the document solely use icons that may be confusing to a reader without a supporting text-based label?
- This may confuse someone not familiar with your icon nomenclature; particularly someone unfamiliar with technology (like the Amish), or an elderly person less familiar with icon-based language.
If you answered “yes” to one of these questions, request the document designer to revise their design. No matter how much meta-data you put on the document, the fundamental design would not be accessible to everyone; it is best to only invest time into 508 remediation when the starting document has a chance to meet compliance due to its fundamental design choices.
Readability of the Text’s Font Colour
- Standard size text should have a contrast ratio of 4.5:1. (Reference to WCAG)
- Large text must have a contrast ratio of 3:1. (14pt bold weight OR 18pt normal weight) (Reference to WCAG)
- Examples of low contrast that is not accessible would be a white background, with a light grey font colour.
- Logos do not have to adhere to contrast rules.
- Warning: If the text in the document does not meet these contrast minimums, then the document is not accessible.
Tools for Testing Colour Contrast
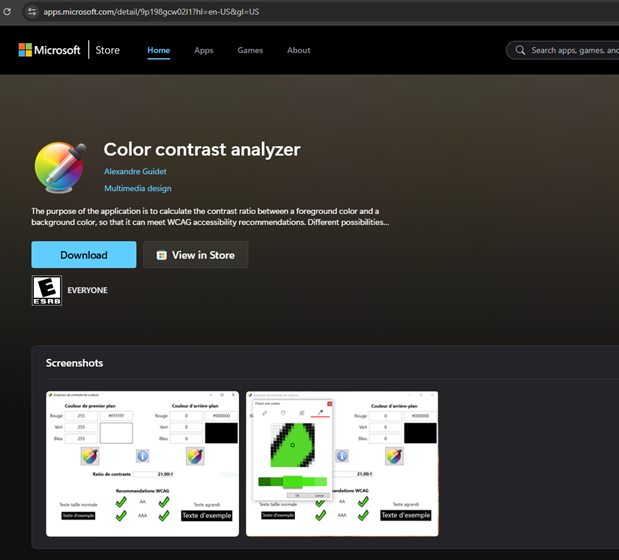
- Colour Contrast Analyzer is available in the Microsoft Store for free to analyze the colours at https://apps.microsoft.com/detail/9p198gcw02l1?hl=en-US&gl=US . This is ideal for people who don’t know how to inspect code and type in a hexadecimal # for testing. It should work for any sniff testing with its eye dropper tool.
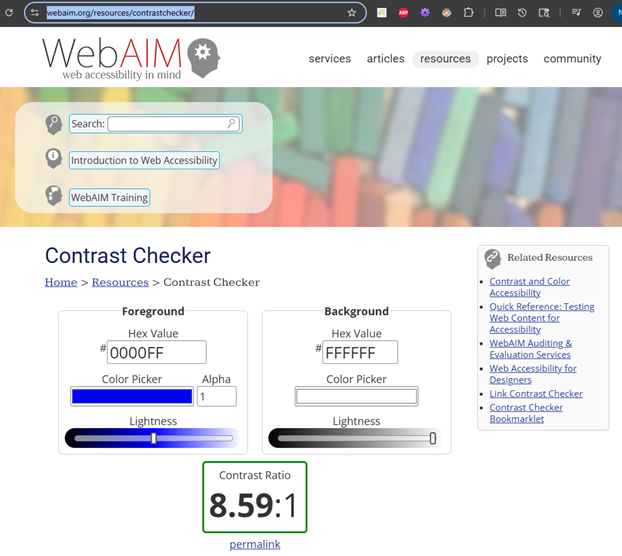
- The Web AIM Contrast Checker is available online for free at https://webaim.org/resources/contrastchecker/. This works well if you understand hexadecimal or RGB values, such as for designers and developers. It offers more precision than an eye-dropper tool.
Check the File Properties in Acrobat
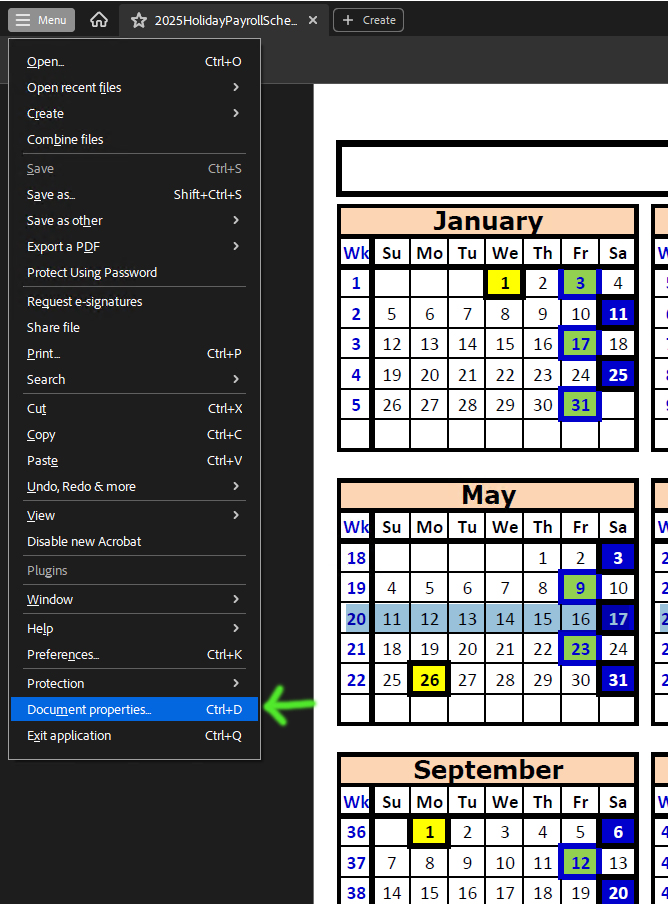
- Go to Menu > Document Properties.
- In the Description Tab, verify that the file contains a meaningful, descriptive Title. Warning – If this is not set, the PDF is not accessible. Generally, you don’t need the file extension in the title.
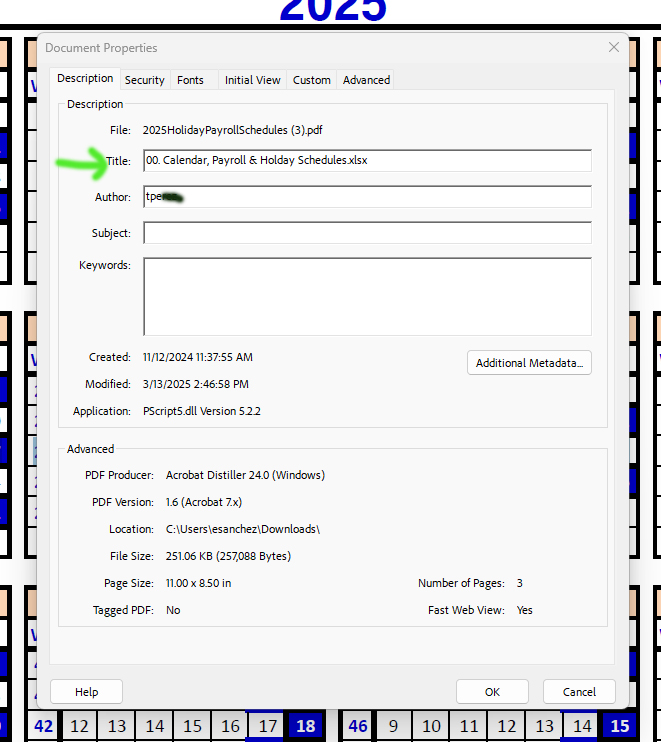
- In the Description Tab, verify the file allows for tags in the file (Tagged PDF: Yes) If this is not set, the PDF is not accessible.

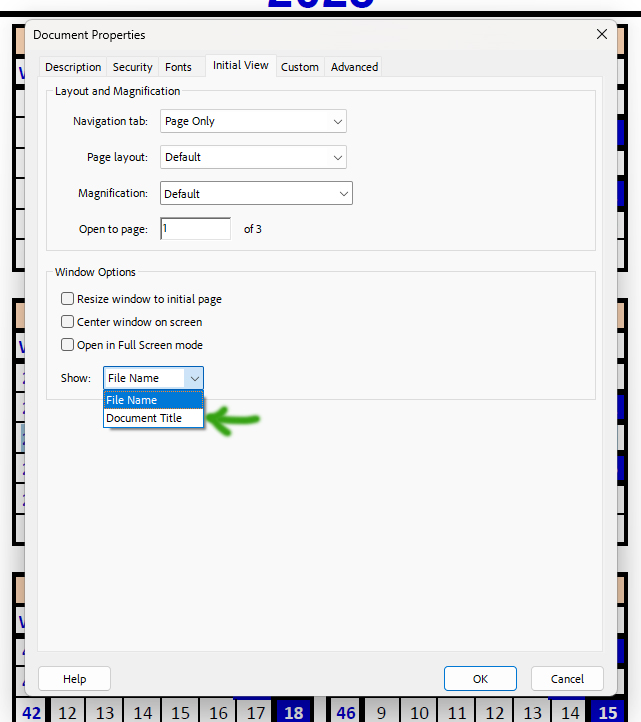
- In the Initial View Tab, verify Show is set to Document Title. Warning: If this is not set, the PDF is not accessible.
- In the Security Tab, verify the file allows for copying content for accessibility. (Content Copying for Accessibility: Allowed). If this is not set, the PDF is not accessible.
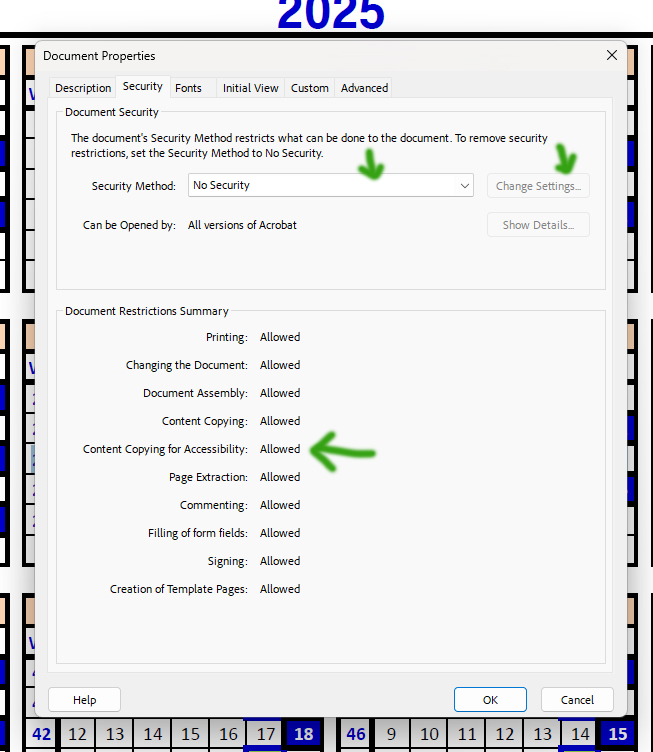
- You can change the security settings of the PDF to be accessible by setting the Security Method to No Security, or by clicking on the Change Settings button and applying custom security settings that do allow for Content Copying for Accessibility.
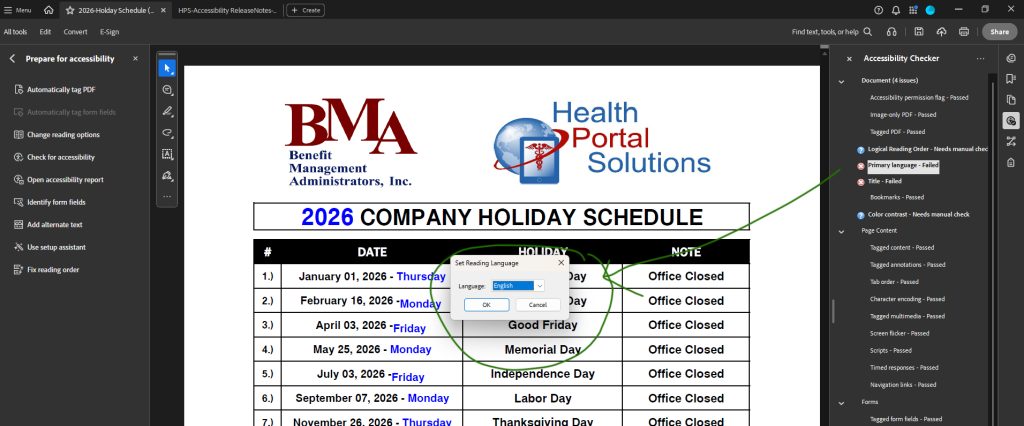
- In the Advanced Tab, verify the file specifies the accurate Language of the document; this controls the voice synthesizer of the document. Warning: If this is not set to the proper language, the PDF is not accessible.
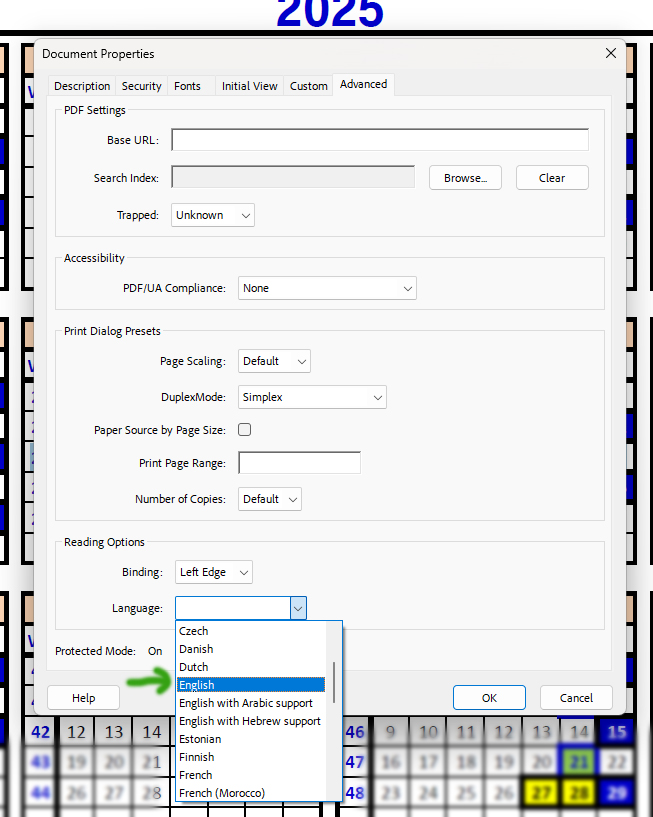
- (Individual pieces of text should be set to have a different language from the overall document language, if you have a mixed-language document.)
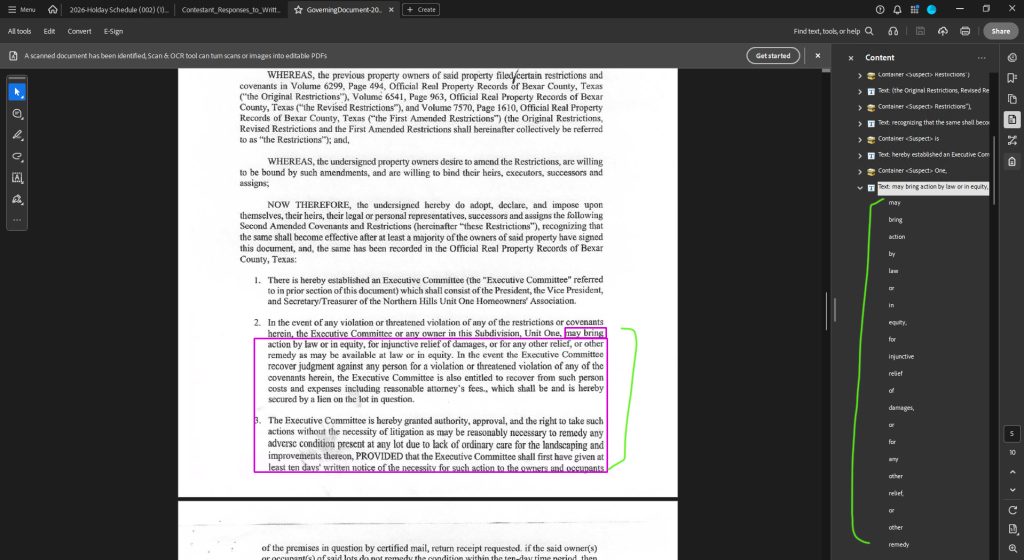
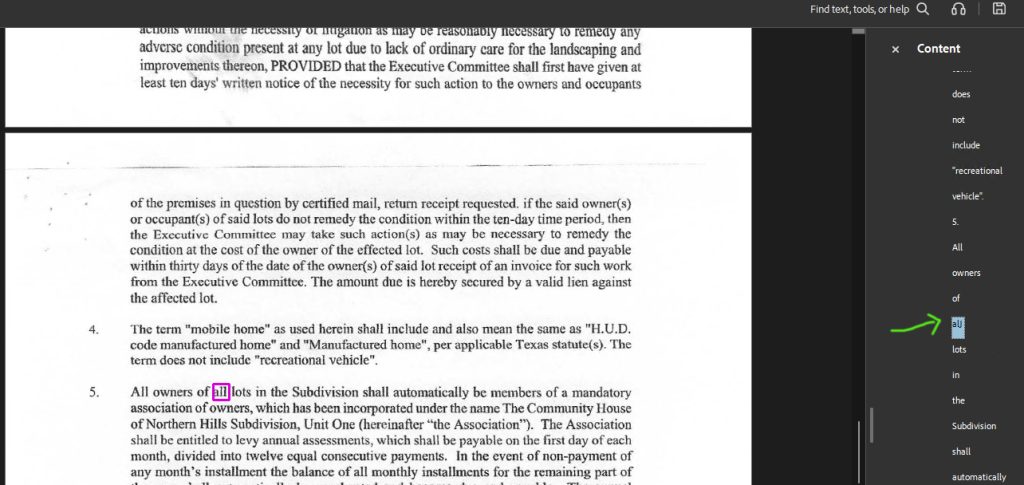
Content Layer
You will need to look beyond the immediate visual appearance of the document.
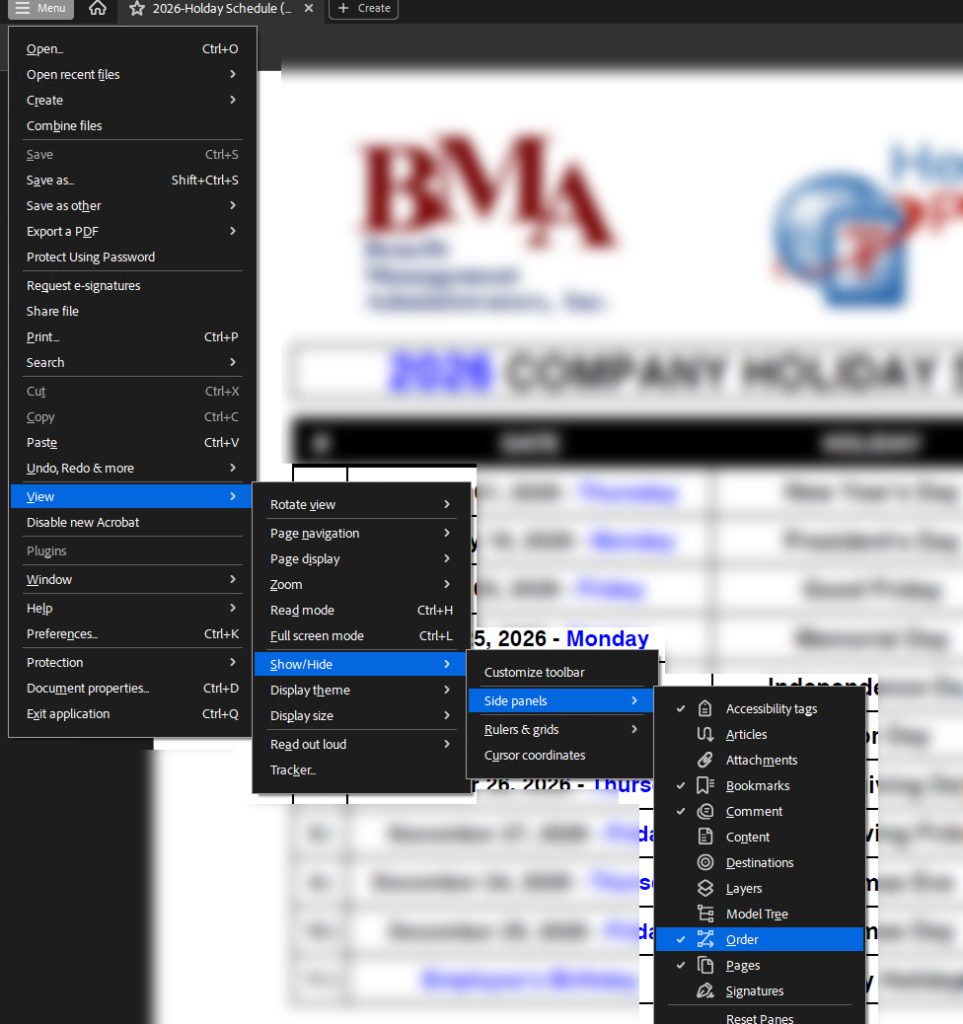
- Go to Menu > View > Show / Hide > Side Panels > Content.
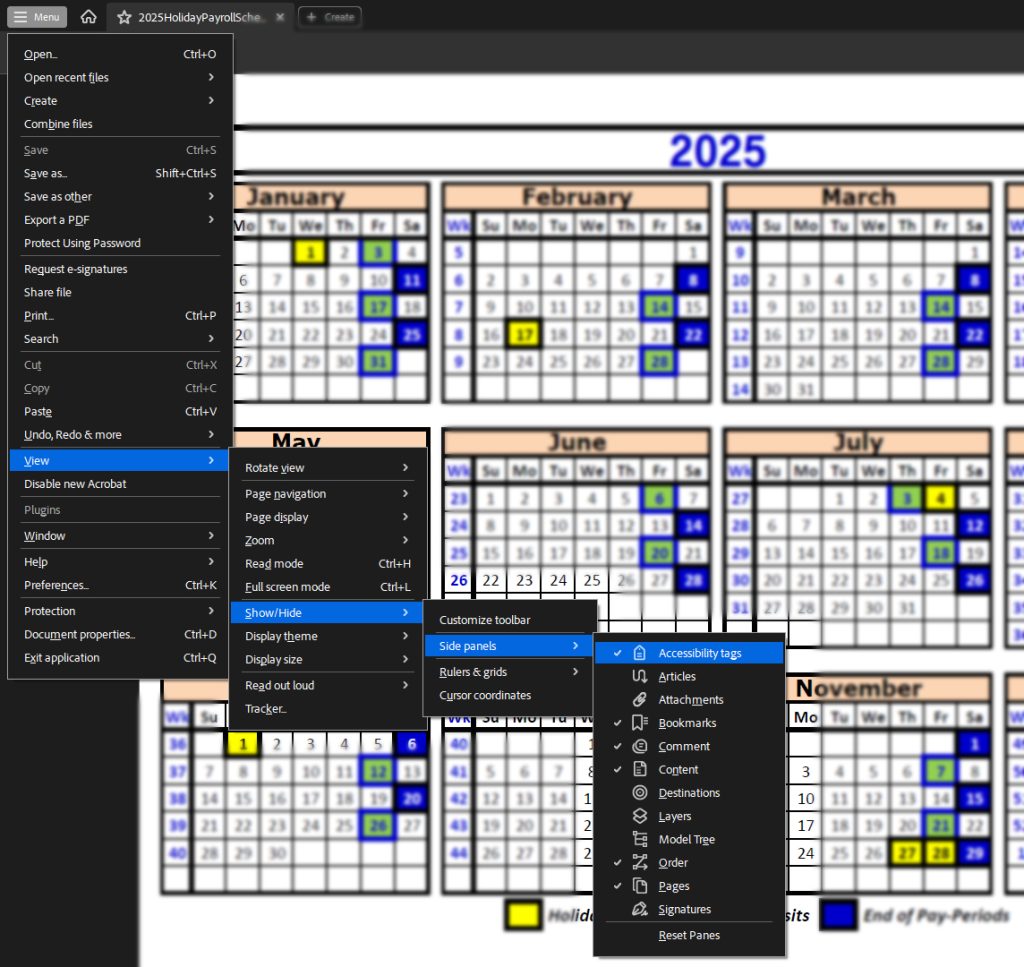
- You will then see a Content pane open up.
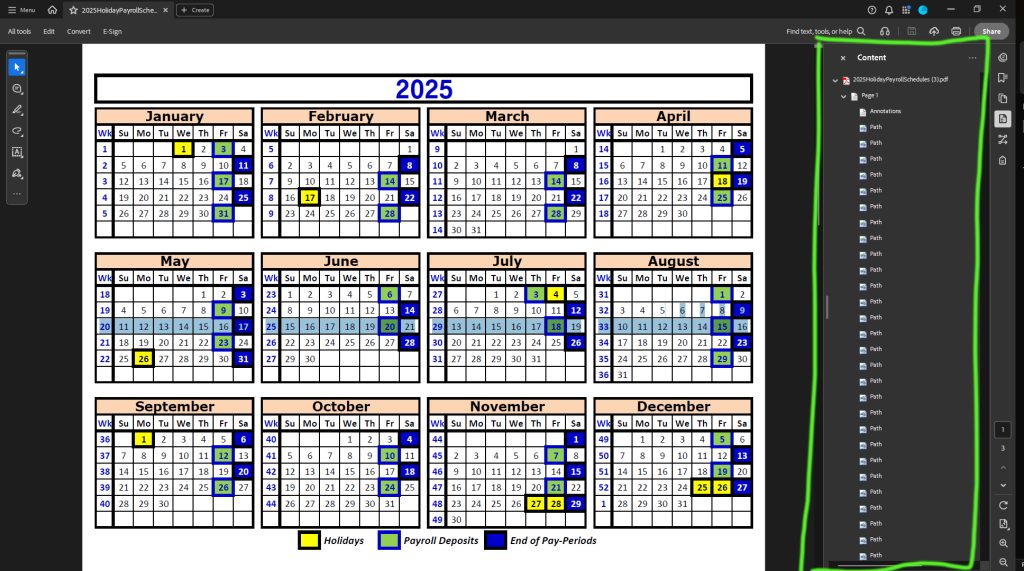
- If the file is set up potentially correctly, you will see a collapse/expandable tree with varying levels of content assigned to the pages of the PDF.
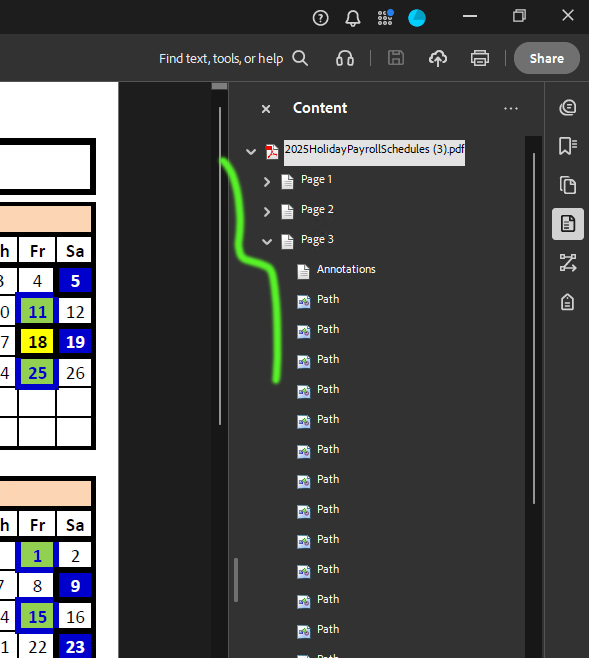
- If you do not see any content tree, the file is certainly not set up correctly.
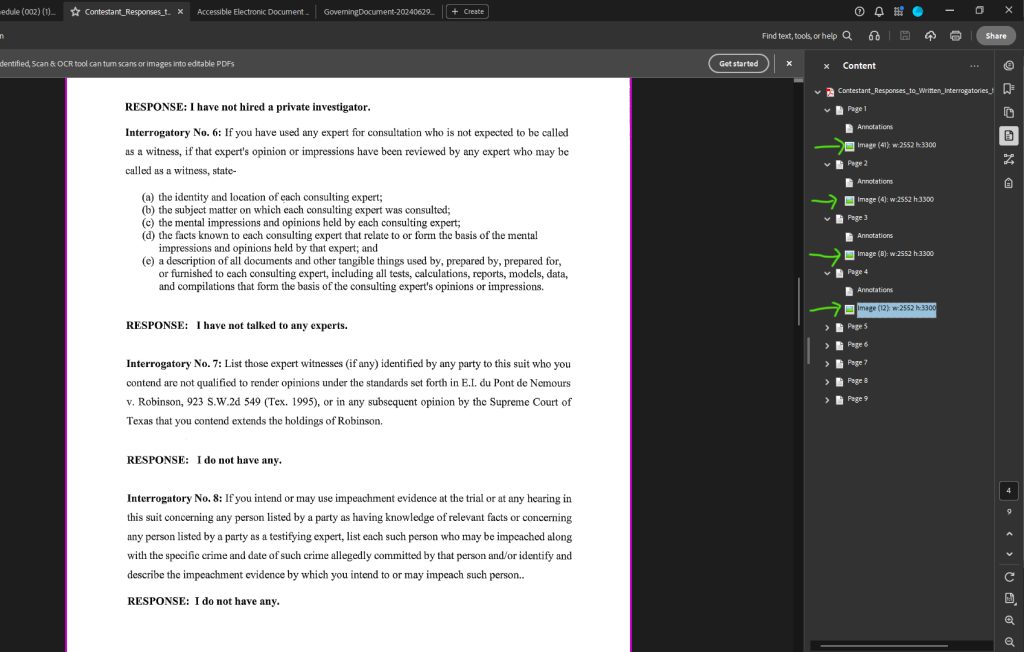
If a tree does not include all the content visually present in the meta-data content tree (example: instead of seeing text in the content pane, you only see images), you will need to OCR (optical character recognition) the content for accessibility.
You can hit Shift + 8 on your keyboard to expand all tree branches.
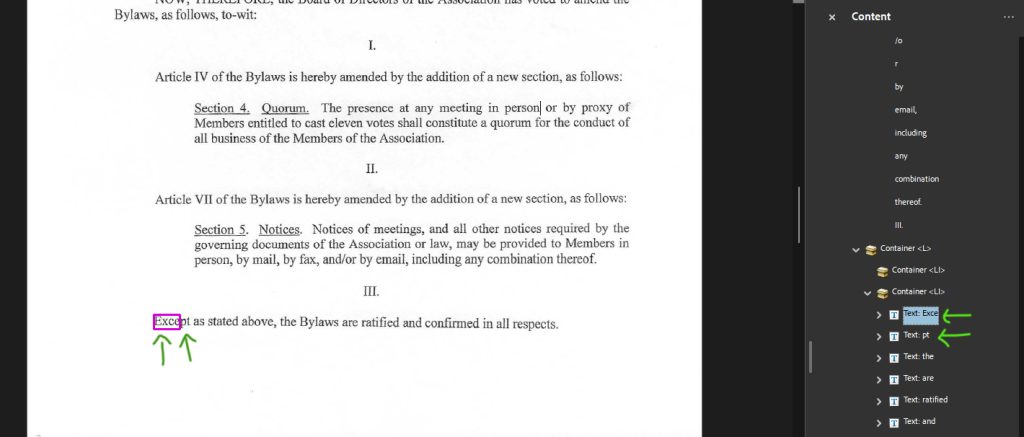
Tag Layer
Tags must follow the visible layout of the page or be in a Logical Reading Order. This allows people using screen readers to have the same equivalent experience as visual people. Without a Logical Reading Order, a non-visual person maybe find the document to be incoherent and not useful.
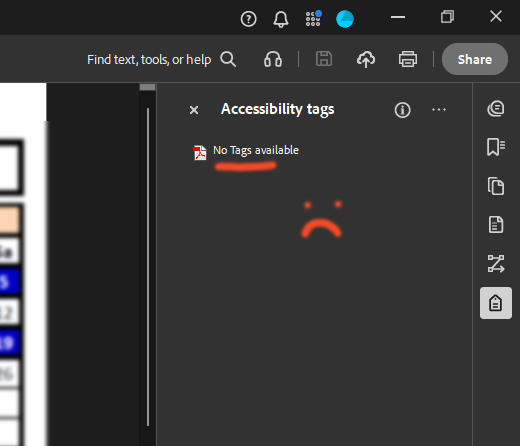
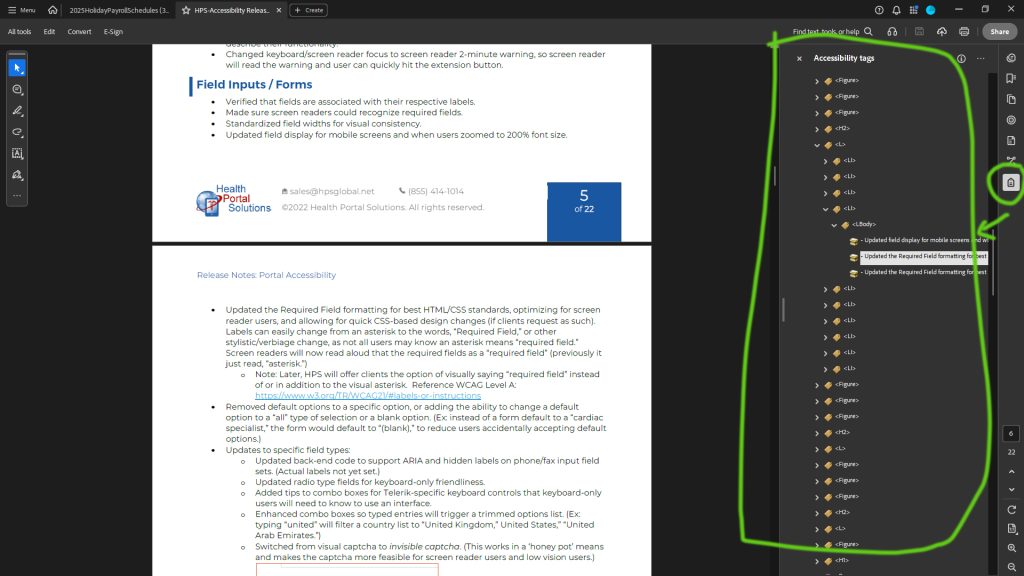
- Go to Menu > View > Show / Hide > Side Panels > Accessibility Tags.

- You will see the Accessibility Tags panel appear.
- You can hit Shift + 8 on your keyboard to expand all tree branches.
- You’ll know the document is not accessible if there are no tags present.
- Use your mouse to hover over the tags in the tag tree. You should see the corresponding text in the document highlighting; if you don’t see this accurately for 100% of the pieces of content, you will need to edit the tags to sync-up.
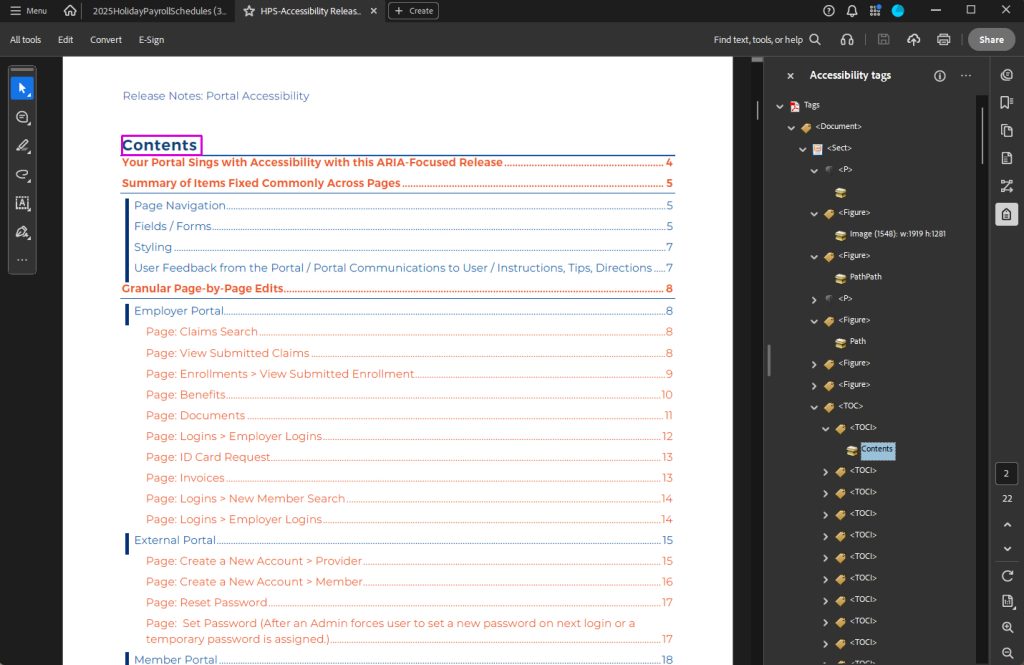
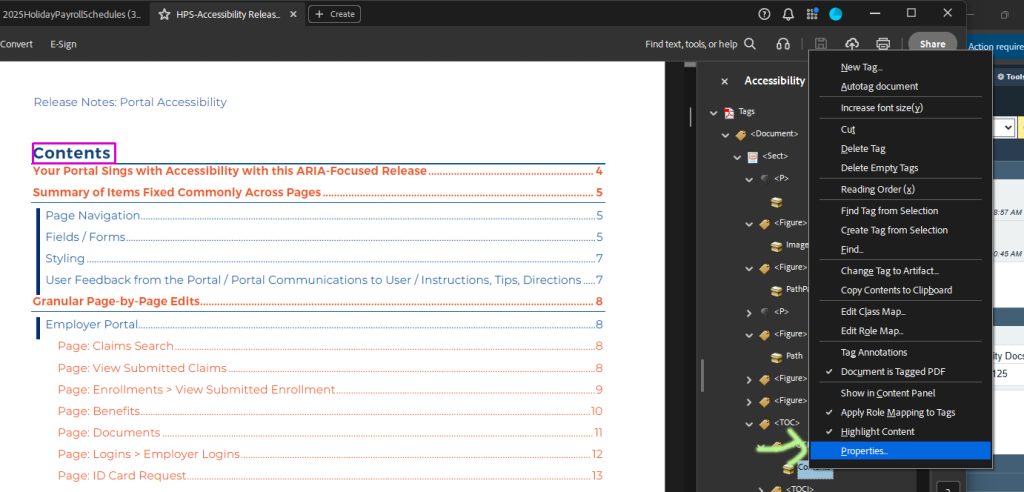
- To inspect any particular Tag, right click on that tag, select Properties and review the settings in the pop-up prompt.
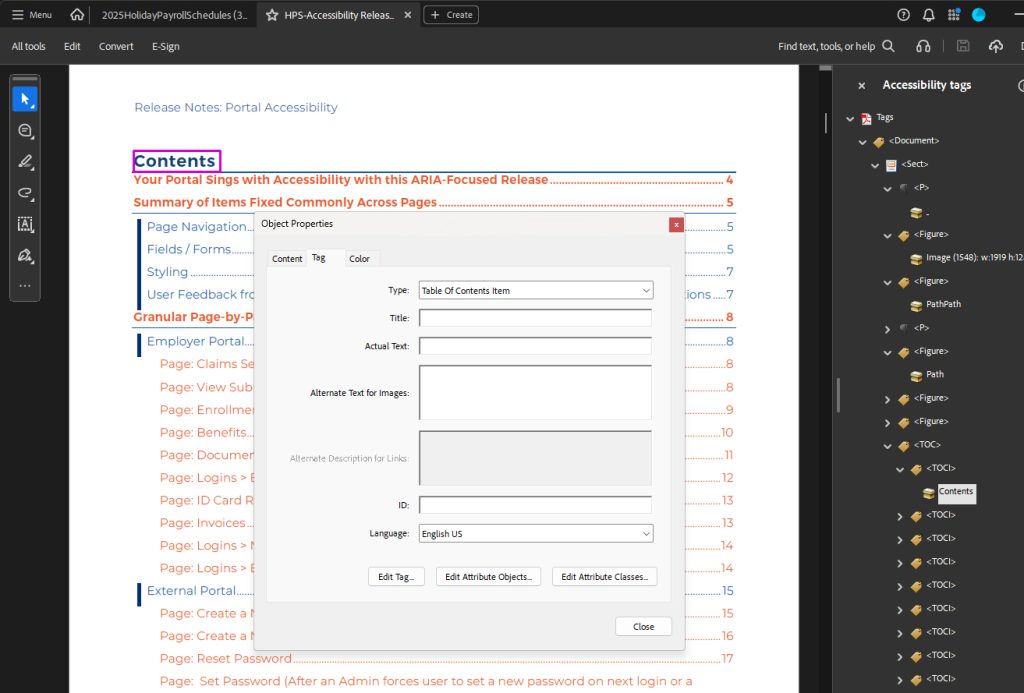
- Visually inspect the document. Are there lines of text that you would identify as a heading? You’ll need to make sure these are mapped to the proper tags in the non-visual portion of the document.
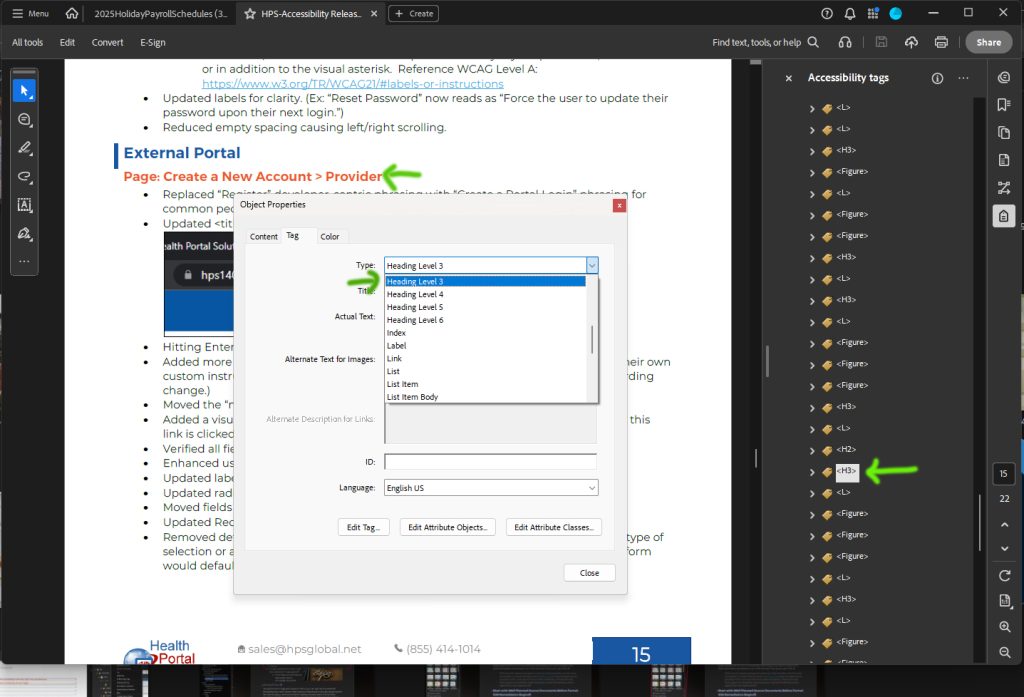
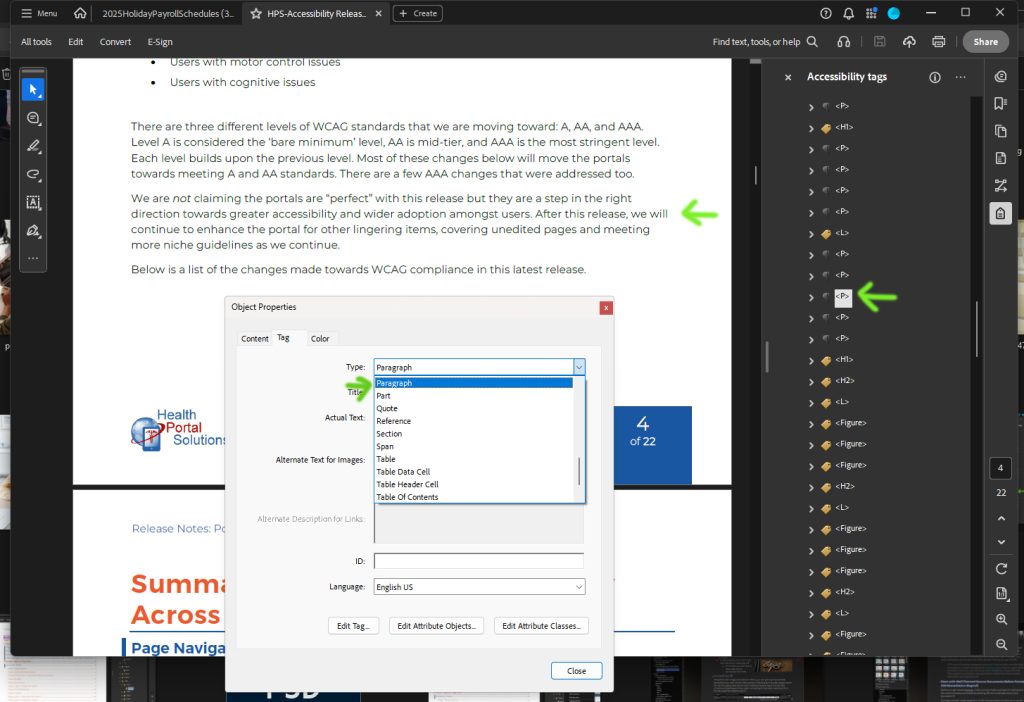
- If you see a piece of text with an improper tag, right-click on that tag, select Properties, and in the Object Properties pop-up > Tag tab, change the type to the appropriate tag type. The updated Tag will be reflected in the Tags tree.
Images
All text should be appropriately marked as a Figure.
Headings
Something that looks like a heading to your eyes, typically in a large font, bold, uppercase or title case, should be marked as a Heading.
Paragraph
Common text should be marked as Paragraph.
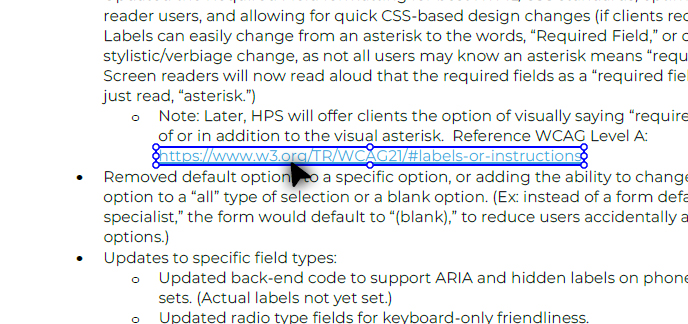
Links
- Links should be properly tagged. They should be self-descriptive within the content or add in guidance for screen readers.
- Links should appear nested under the relevant <p> or Heading tag that they are associated with.
To properly add or edit a link:
- Look at the top menu bar. Click on Edit. In the Add Content section, click on Link (even if you are just editing a link).
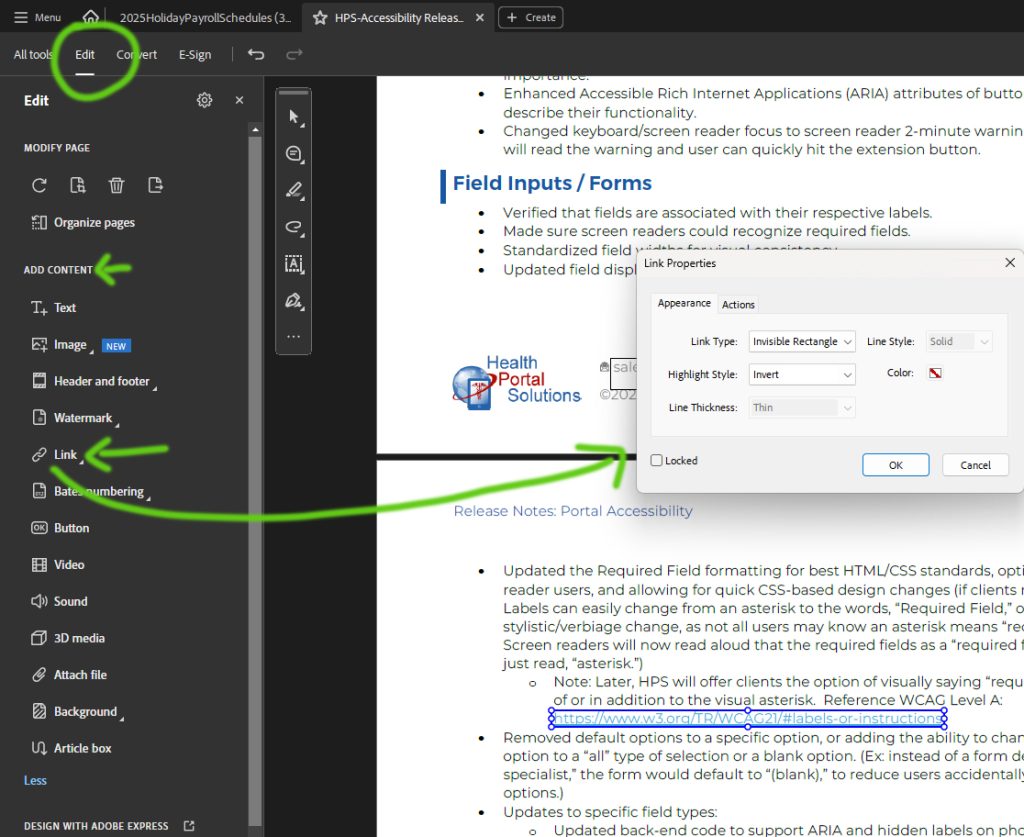
- Use the crosshair mouse tool to click and drag around a link region OR click on an existing link boundary and double click on the boundary.
- You will see a Link Properties window pop-up.

- In the Actions panel, click on the Open a Web Link Select Action.
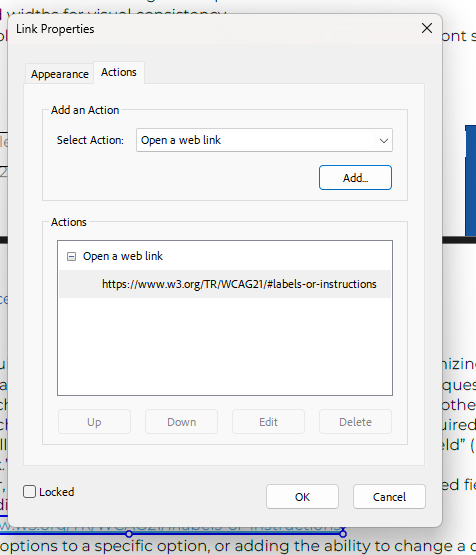
- Enter your destination URL in the Enter a URL for this Link Click OK.
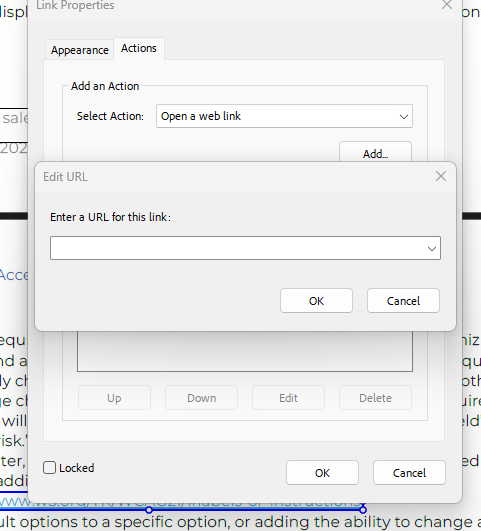
- Click OK.
Now that the link annotation is added, you’ll then have to add a tag:
If the associated sentence is not tagged:
- Exit Edit mode (click the x), highlight that text
- Open the Accessibility Tags panel
- Highlight the containing text, click on the Ellipsis in the Accessibility Tags panel, click on Make Tag from Selection.
- Tags should be added to the Tag Tree. Feel free to delete any erroneous tags that may have been added with the effort.
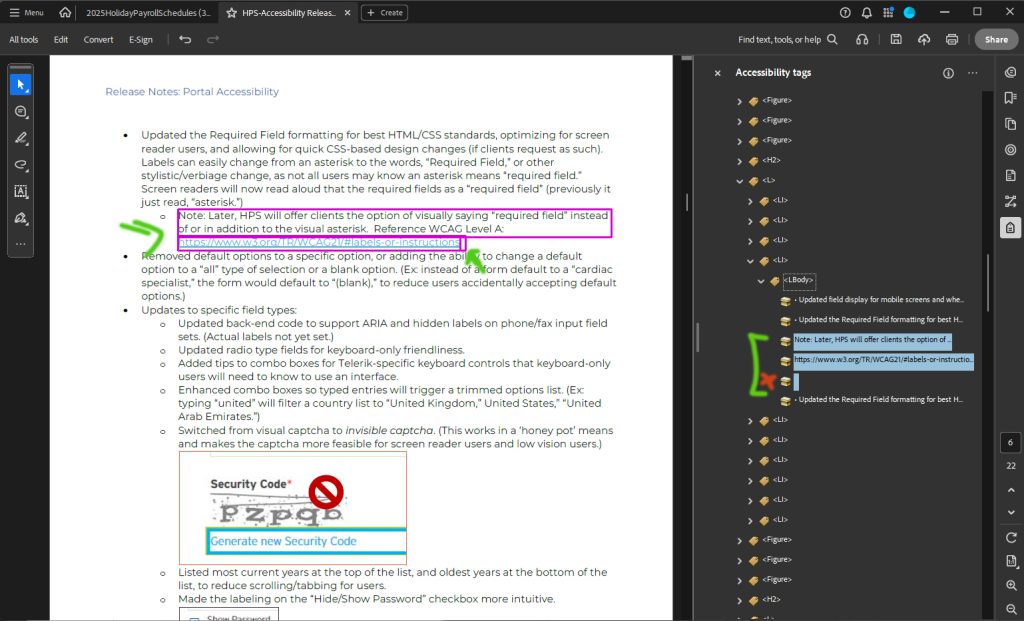
- If needed, you can click and drag a link in the tree to change its order or nest it under a parent item.
Other
Other content types could be Lists, Data, Table, Figures, and Form Fields.
If you are not sure what tag is being used for text, right-click the item in the tag tree and view the pop-up information.
Touch Up the Reading Order Tool
Use the Touch Up Reading Order tool to assign tags to the document.
If the tags currently in the document are a mess, you can click on the top-level tag in the tree and hit Delete on your keyboard to clear all messy tags.
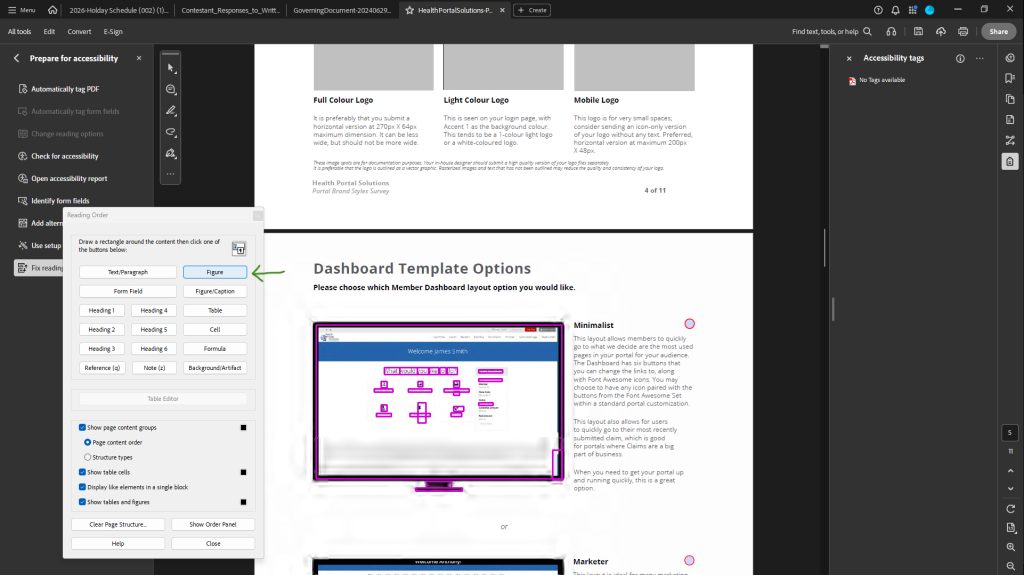
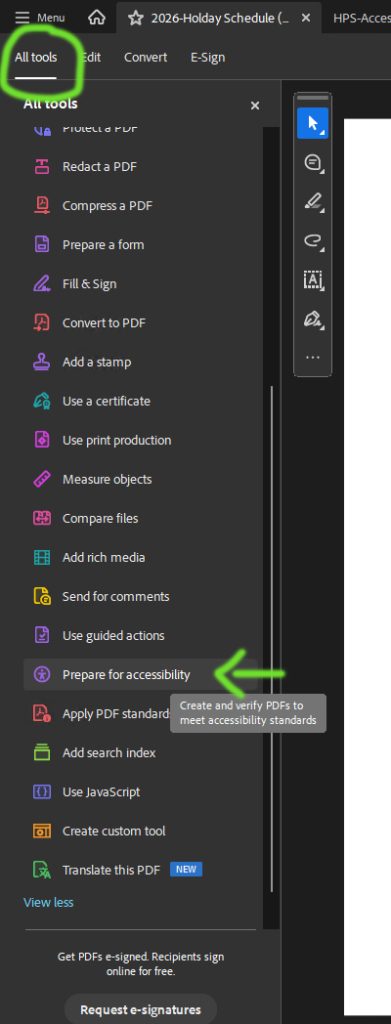
How to Access the Reading Order Tool
- Click on the All Tools menu option > Prepare for Accessibility.
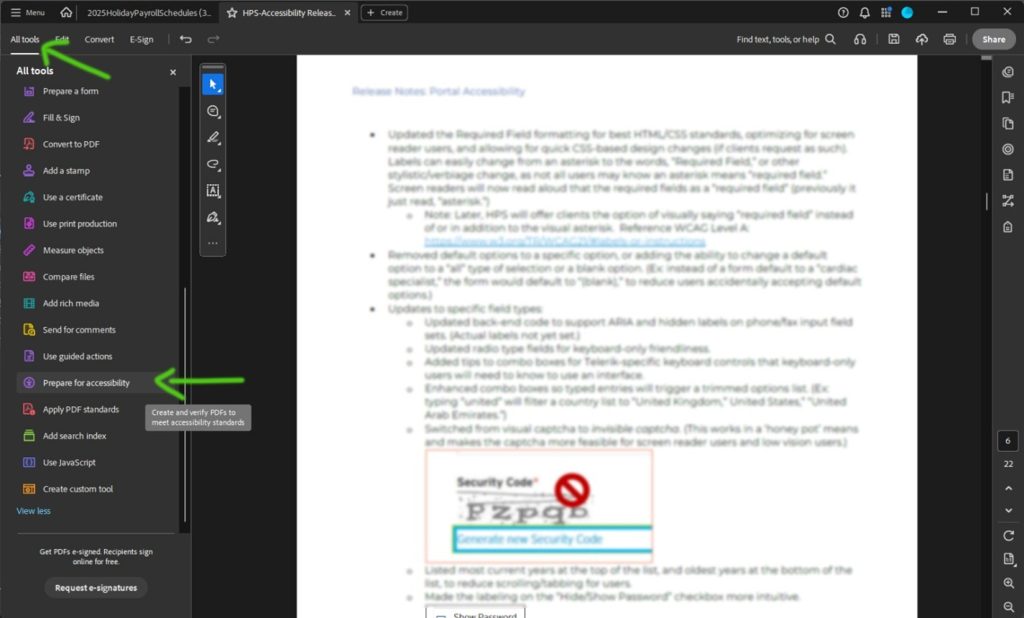
- Click on the Fix Reading Order
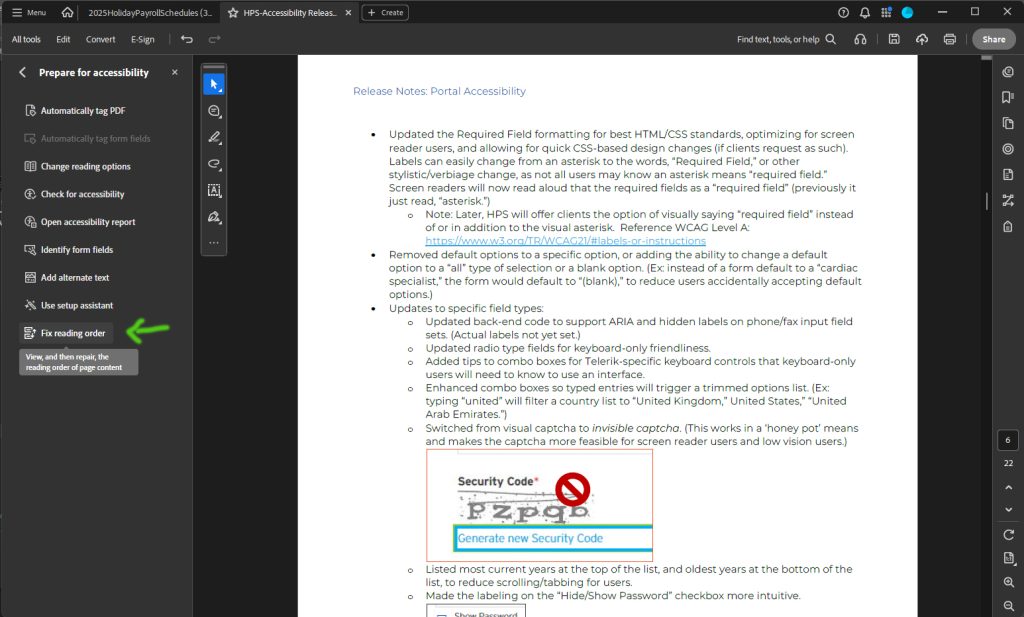
- In the Order pane, select Options > Show Reading Order Panel. A pop-up will appear.
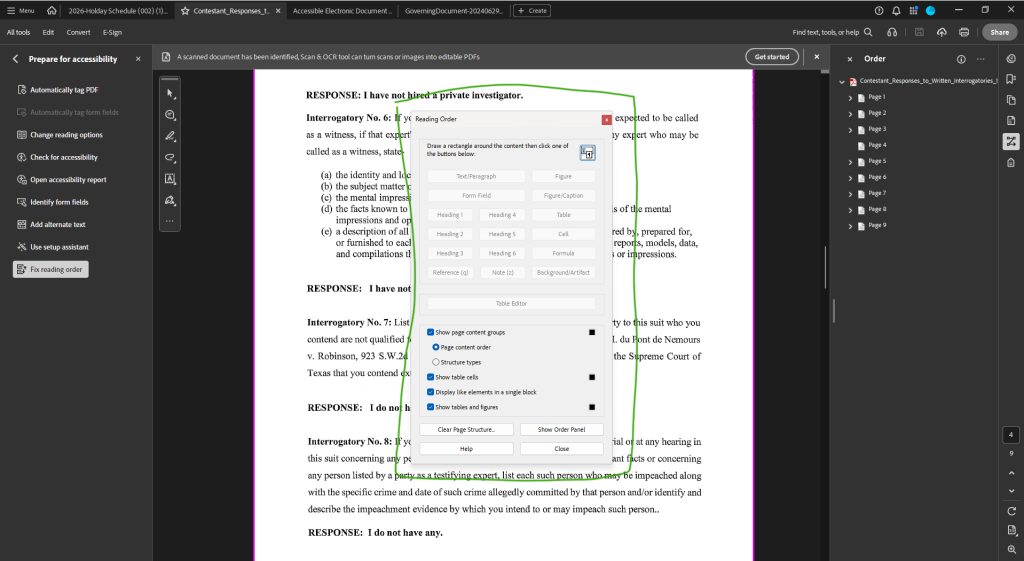
- Draw a rectangle around the piece of text that you want to assign a tag to, then click on the tag type button appropriate to that content.

- If you don’t see the exact right content type (maybe like a List Item), just pick Text/Paragraph from the Reading Order pop-up, and then go into the Accessibility Tags pane > right-click on that item > Properties > assign the correct type from the drop-down menu.
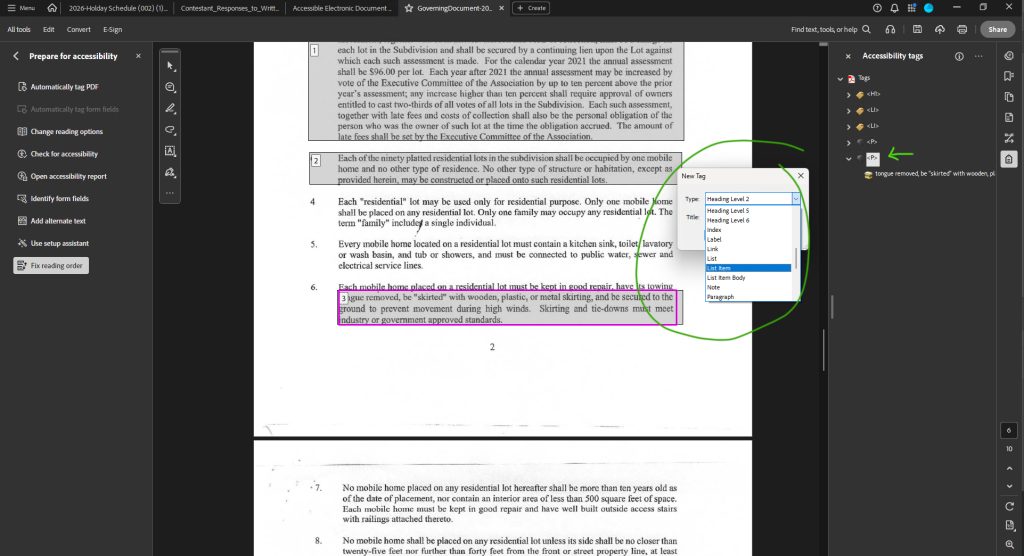
- If you don’t see the exact right content type (maybe like a List Item), just pick Text/Paragraph from the Reading Order pop-up, and then go into the Accessibility Tags pane > right-click on that item > Properties > assign the correct type from the drop-down menu.
- You’ll be dragging your rectangle shape around the paragraphs, header, lists, and all of pieces of text on the pages.
Potential Tags from the Touch-Up Reading Tools
| Tool Button Label | Description | HTML Equivalent |
| Text | Paragraphs and Lists | <p> |
| Form Field | Form Field Elements | <form> |
| Heading 1 | Top-level heading | <h1> |
| Heading 2 | 2nd Level Heading | <h2> |
| Heading 3 | 3rd Level Heading | <h3> |
| Figure | Images and objects | <figure> |
| Figure / Captions | Figures with captions | <caption> |
| Table | Data Tables | <table>
<tr> <th> <td> |
| Cell | A Cell of a Table | <td> |
| Formula | Equations in the Document | <formula> |
| Background | Respective Content and Decorative Images | <artifact> |
Tags not available in the Touch-Up tool are such as:
- Block Quotes
- Notes
- References
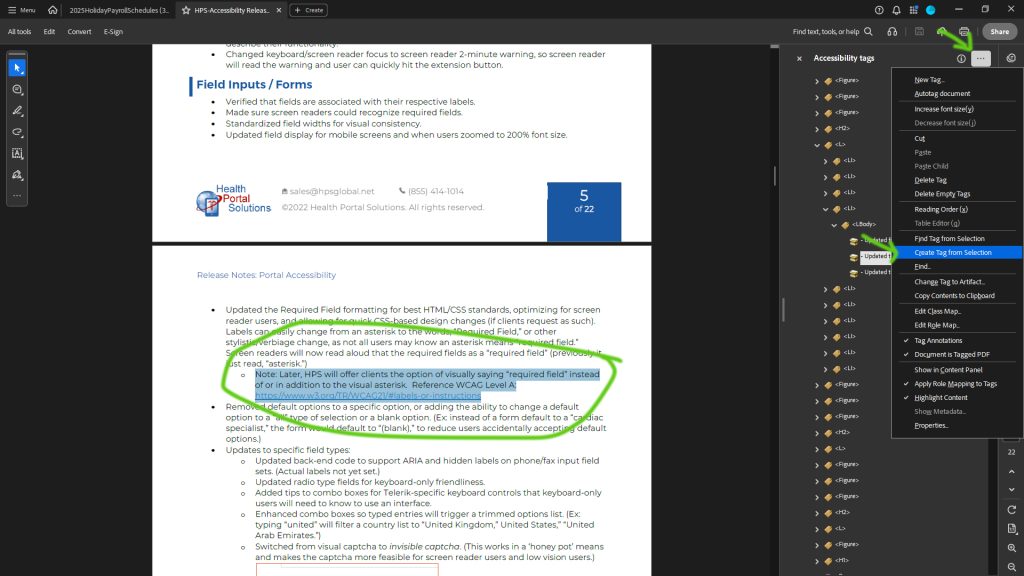
Create Tag from Selection Tool
With the Touch-up pane still open…
- Instead of picking a tag from the presented buttons, after drawing your tag rectangle, go into the Tags pane > Options > select Create Tag from Selection.
- A pop-up will appear; assign the appropriate tag to the rectangle.
Logical Reading Order
The screen reader version of the content should be consistent with the visual presentation of the content. For instance, if a page is in 3 columns of text, the content should start at the left, top column, then read the top of the 2nd column, and then read the top to bottom of the 3rd column of text. A screen reader that reads the bottom of the 2nd column first, reads some of the 1st column, and then jumps around non-sequentially around the paragraphs would frustrate a screen reader user. This type of problem is more likely with content that was designed in a graphic design program or manually drawn text boxes in Word/Publisher.
- Warning: In the Order pane, as you highlight or keyboard-navigate down a tree list, the tree list order should match the visual presentation order seen on the PDF; this is required for accessibility.
- Warning: If the order of your tags tree does not match, you can click-and-drag branches of the tree until it meets the visual order.
Logical Tag Order of Form Fields
If the PDF contains a form, including objects like form fields, buttons, radio selections, check boxes, or other form objects, those should also be order for people with accessibility needs to match the visual order of these items.
Use your mouse to hover over each form field to reveal that input’s tool tip; the tool tip should match the visual labeling of the input.
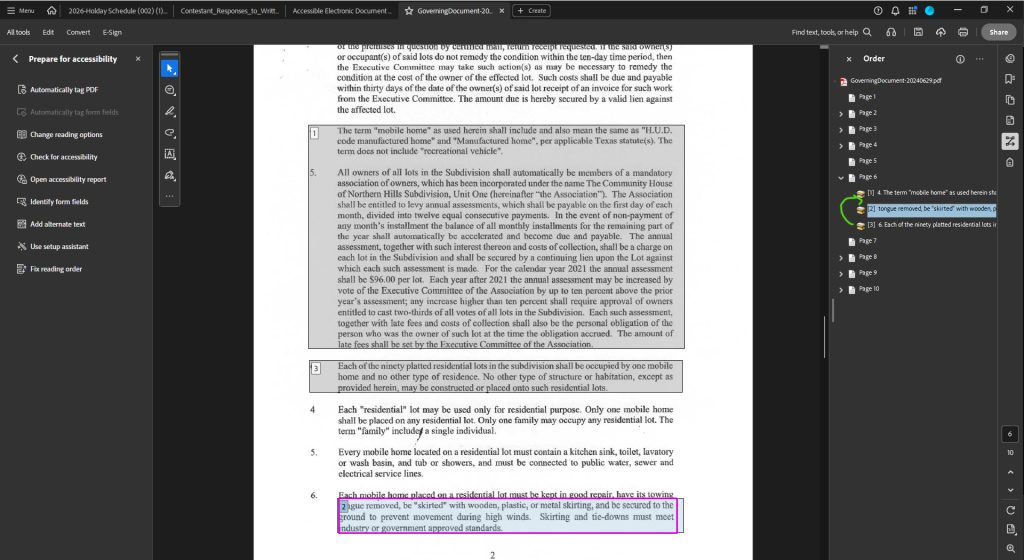
Figure Elements
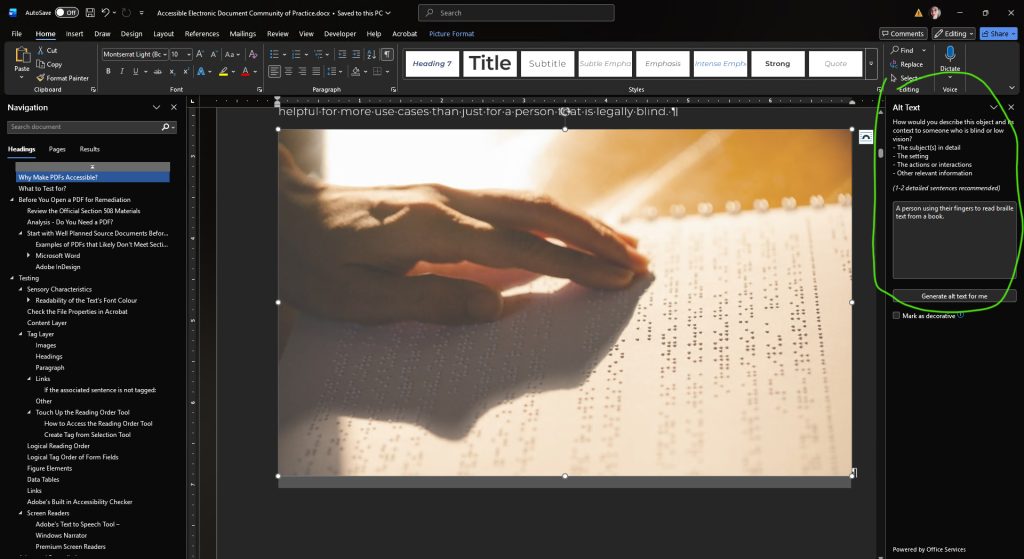
All meaningful figure elements should have alternative text assigned to them so people with visual impairments can have an equivalent experience to someone with full vision. Figure elements that are purely decorative do not need to have alternative text.
Alternative text describes the purpose of an image. It should describe the image accurately, but only as much as needed. An overly descriptive text with lots of elaboration can also be laborious for someone with a screen reader to scan past.
Note – Just because you assigned Alt Text to an image in Microsoft Word, does not mean it automatically translated to alternative text in Adobe Acrobat.
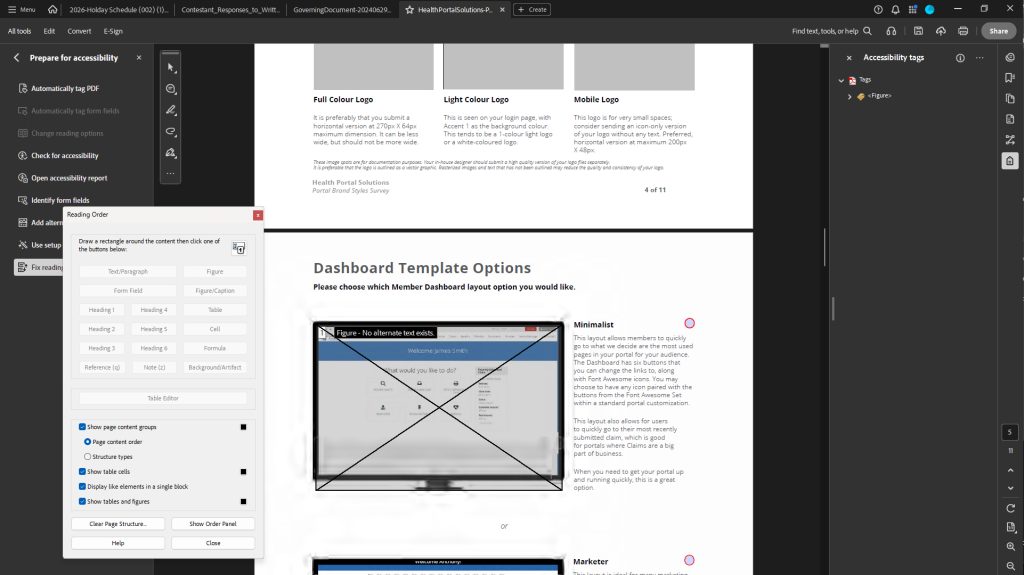
To Add a Tag for an Untagged Figure (image/photo)
- Prepare for Accessibility > Fix Reading Order > Reading Order pop-up > click and drag to highlight an image > Click the Figure button.
- A figure will be added to the Accessibility Tags panel.
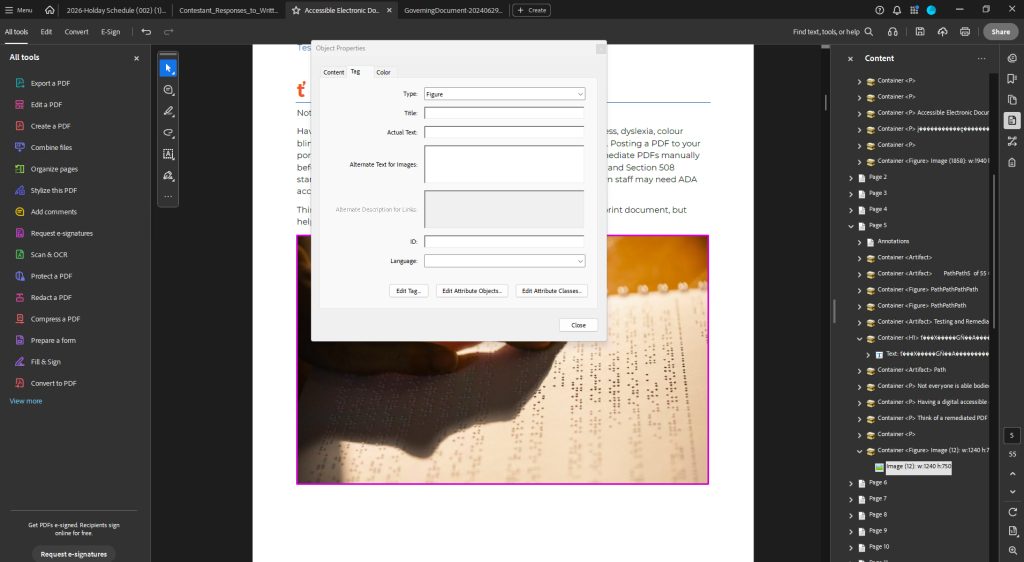
Assign Alt Text or View/Edit Figure Properties
Visually look at the images in the PDF and see if each one has alternative text assigned to, and that the text accurately and concisely describes the image. If any image has no alternative text or a poor description, add or edit it with these steps:
- Right click on that image in the Accessibility Tags tree and select Properties.
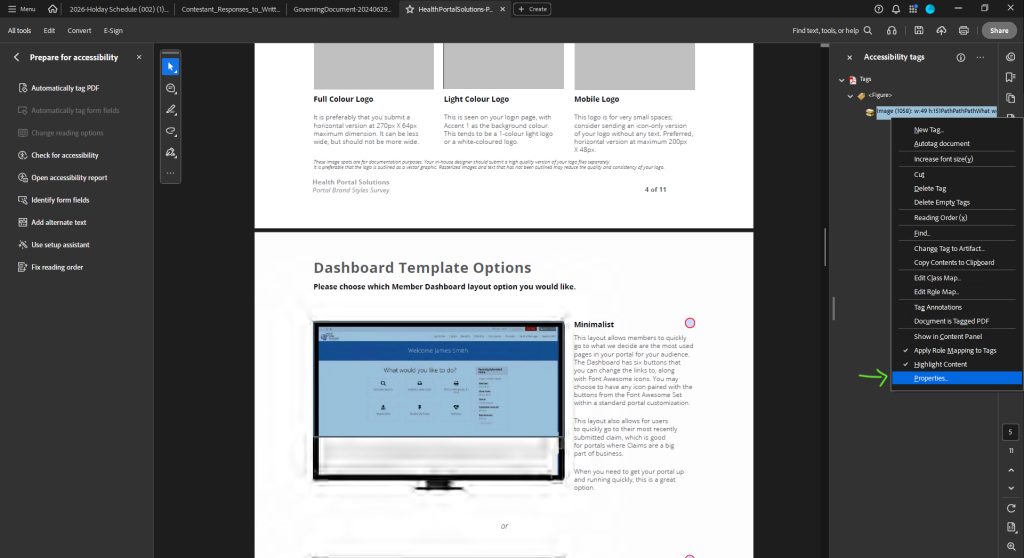
- The Object Properties box will pop-up. Type in an appropriate Alternative Text for Images description. Warning: If the alternative text is not correct, the document is not accessible.
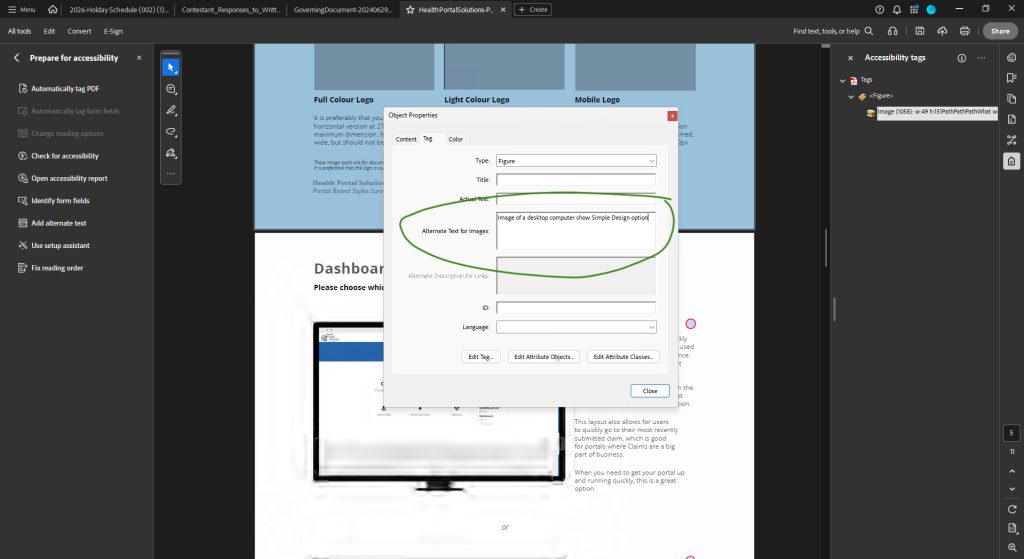
- Click the Close button.
Data Tables
- All tables should be tagged with a Table tag. Warning: If a header does not have a table tag, the document is not accessible.
- All column and row headers should have a Table Heading tag (TH). Warning: If a table header does not have a table header tag, the document is not accessible.
- Complex tables, such as ones with more than one set of data, or cells that span across rows, should contain proper scope. Scope denotes which data cells are Row Headers or Column Headers. Span identifies the number of columns or rows a data cell extends across.
- Tables should not be rasterized or images. They should be actual text.
To evaluate scope and span of a table:
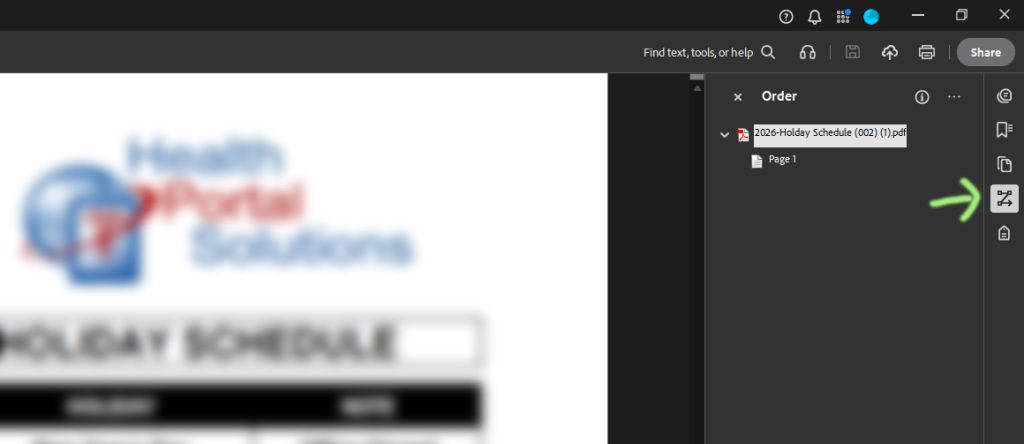
- Open the Order pane: Select Menu > View > Order.
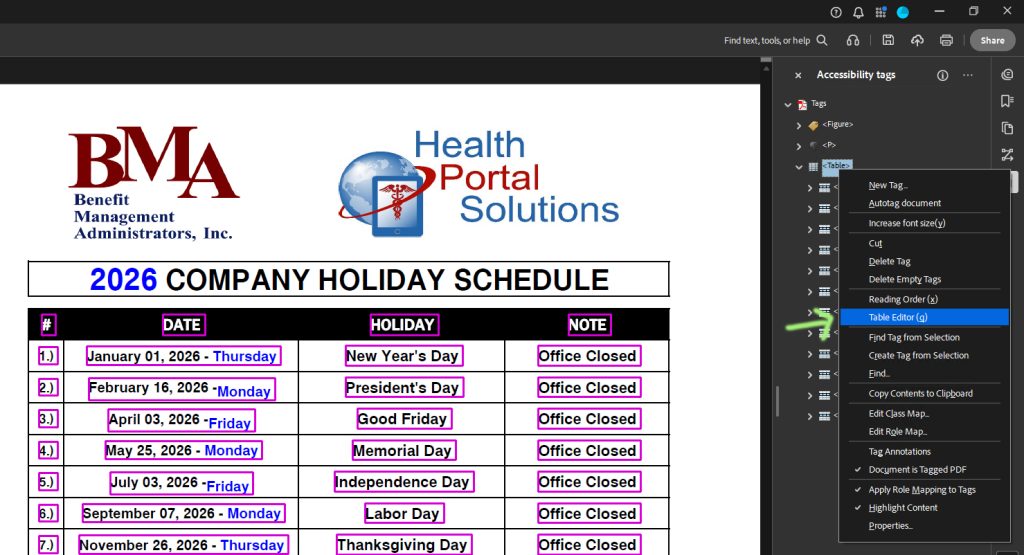
- Select the reading order number associated with the data table. Right-click and Select Table Editor.
- Now right-click on each table column or cell and select Table Cell Properties.
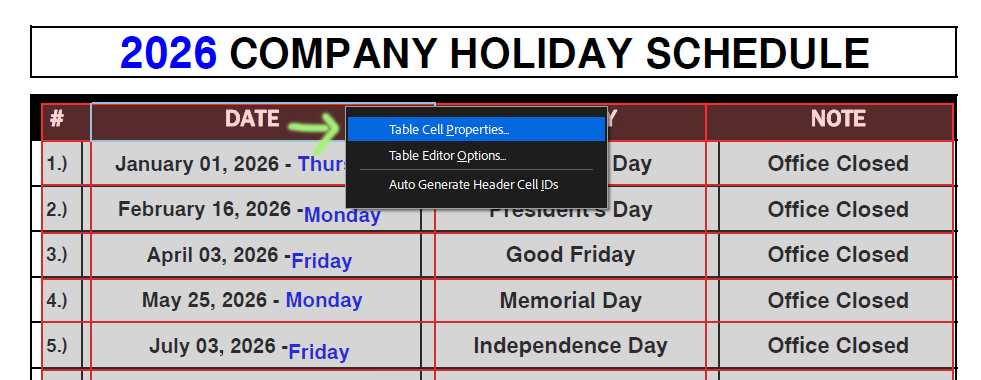
- Verify that Scope is set to Column and Type is set to Header Cell for a table header cell.
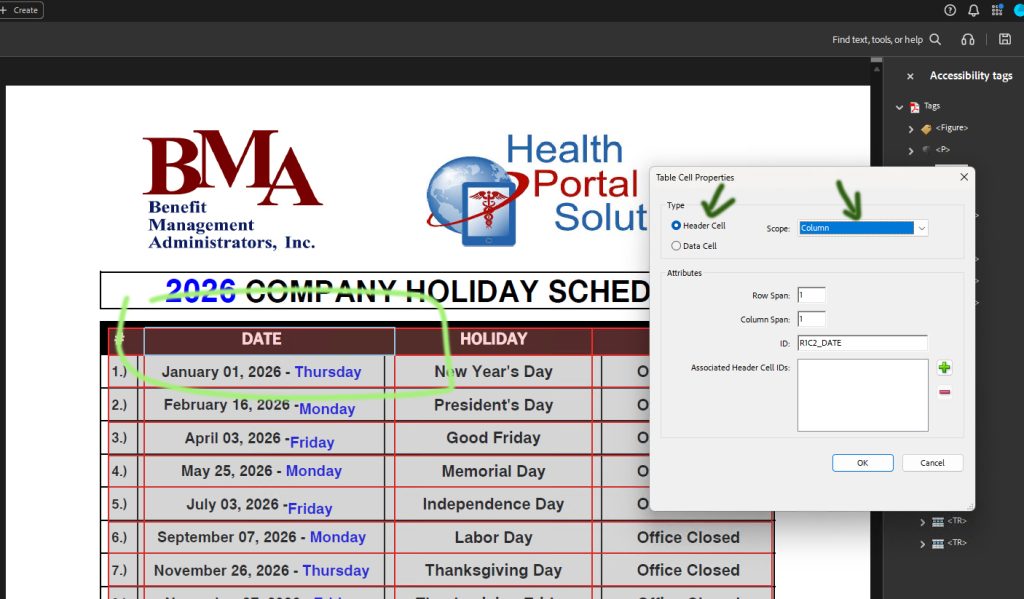
- Verify the Scope is accurate for other cells.
- Verify that any cells that span across rows have the appropriate number of Rows and Columns defined in the Span of the Table Cell Properties. Warning: If the scope and span of a table are not properly set, the PDF is not accessible.
- Verify that content that is NOT part of the table visually, is not tagged as being associated with the data table (this includes the Table Title or captions).
Links
View the PDF and use your Tab key to cycle through the various links in the page. Check that the tab order matches the visual order of the links.
- Links should be uniquely identified.
- The purpose or destination of a link must be clear.
- Links must appear in a Logical Table Order.
- Each link should describe the destination or purpose of the link.
- If an image is a link or user control, the alt text of the image can state the link purpose, function, or destination.
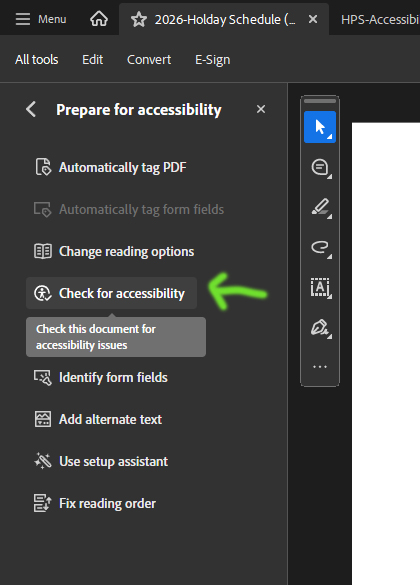
Adobe’s Built in Accessibility Checker
Human testing is best for a document, but once that is completed, you can run the built-in checker.
- Go to All Tools > Prepare for Accessibility > Check for Accessibility.
- Click the Select All button to check all the boxes of testing criteria.
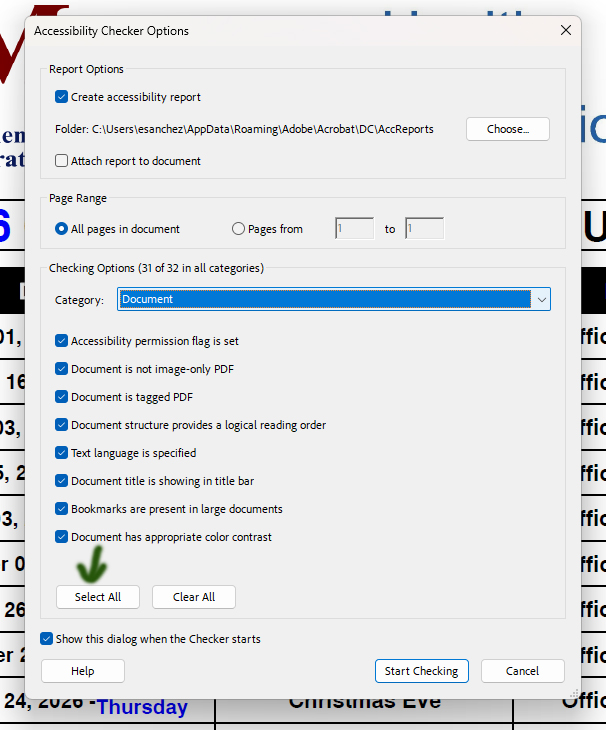
- Click the Start Checking button.
- A report will be generated, and the Accessibility Checker panel will appear.
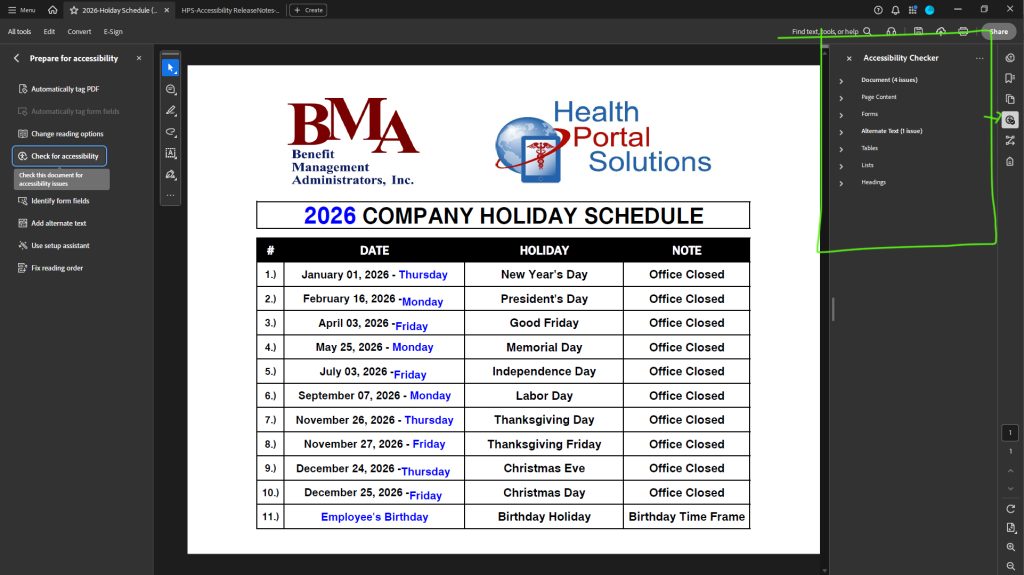
- Expand the accordions to view the details of the report.
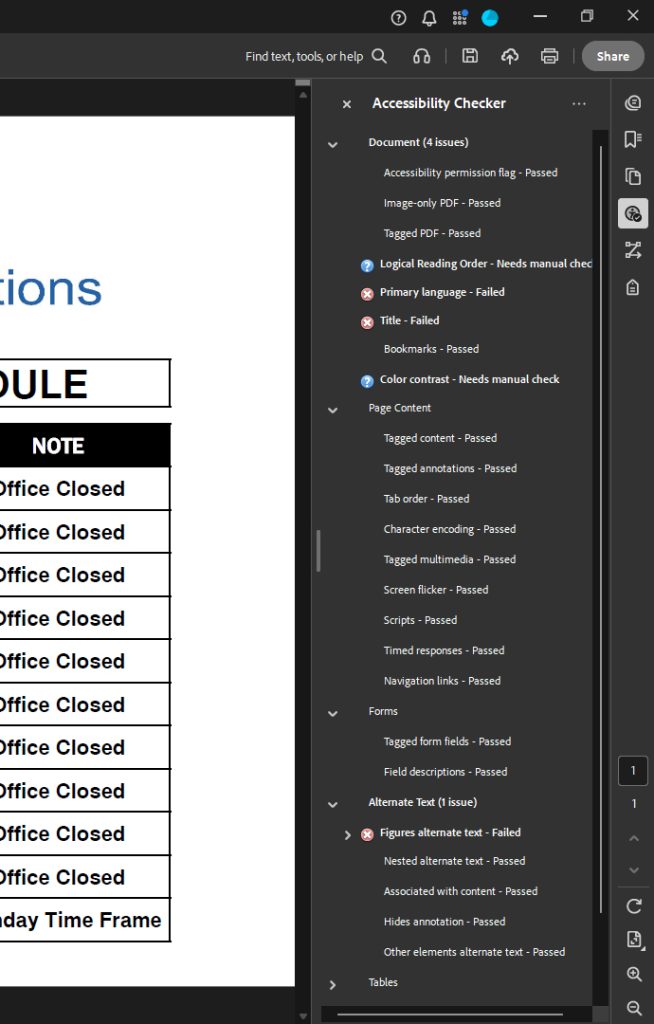
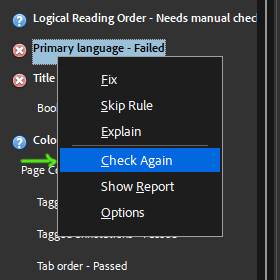
- You might be able to right click on a called-out error and Fix the error on the spot (Fix option), or you may have to manually fix an error elsewhere.
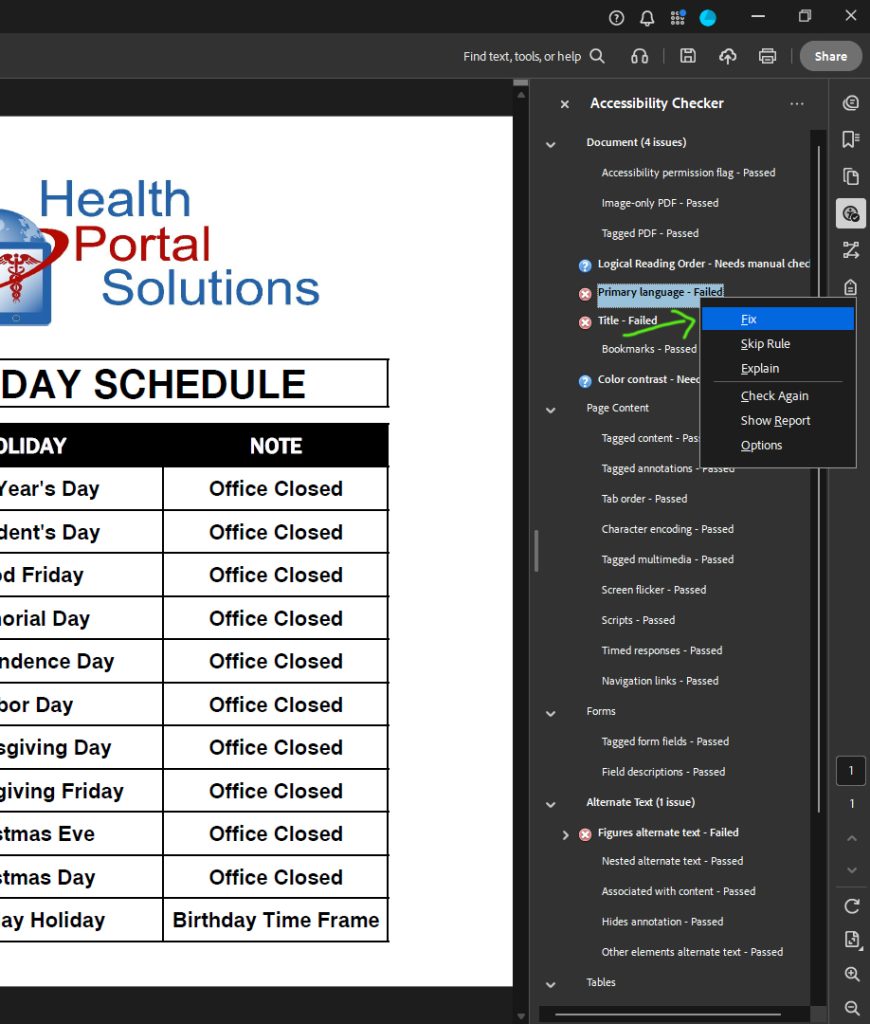
- After fixing an item, right-click on the item and select Check Again to verify your change was sufficient.
Remember, the automated test can assist you, but it is not a replacement for manual testing.
Screen Readers
Adobe’s Text to Speech Tool –
Use this tool to test out the document for yourself. Go to View > Read Out Loud > Activate Read Out Loud. Go to View > Read Out Loud > Start.
Windows Narrator
Windows Narrator on your Windows operating system can also read text in a PDF.
Premium Screen Readers
Any screen reader tool will work differently. JAWS is a premium screen reader tool used often by people with disabilities.
Advanced Remediation
If you open a PDF and the text is not 100% highlightable by your mouse, or text does not display in the Content View of the PDF, then you will have to place that content into the content layer of the PDF. You have 2 options:
Optical Character Recognition (OCR) –
This is an automated tool in Adobe Acrobat. It attempts to read the rasterized text in the file and overlay an automatically generated content layer. It can be successful if the source document has an easy-to-interpret font and has a good enough scan resolution. If the source document is blurry or skewed, OCR attempts may not work; if the source document does have these problems, try to get a cleaner version of the file before you start remediation to avoid much clean-up efforts from yourself.
To use the Scan and OCR tool:
- Open your document.
- You can either go to All Tools > Scan and OCR, OR click on the rasterized file, and click on Scan Text. Both routes take you to the same destination.
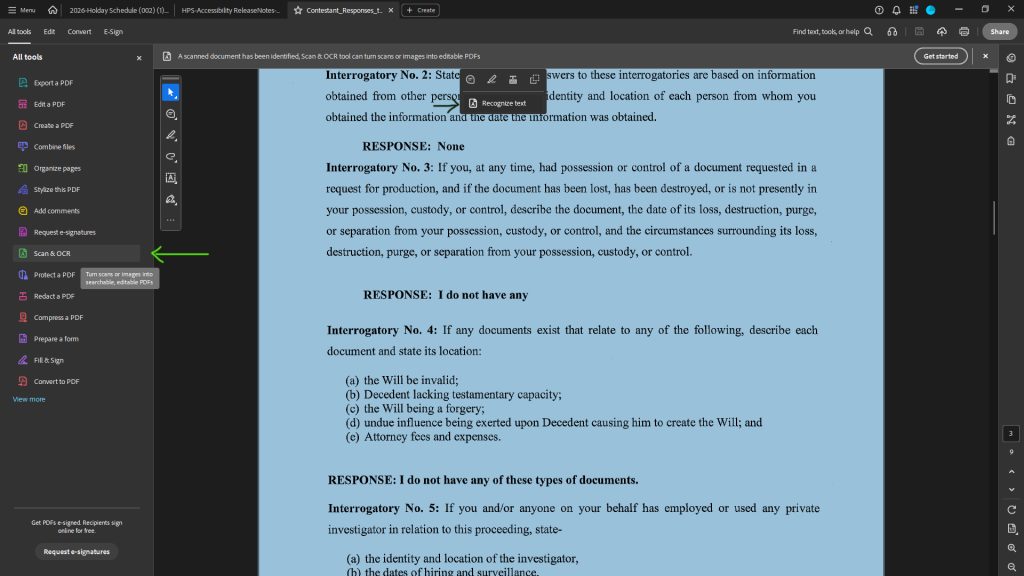
- Now click on either:
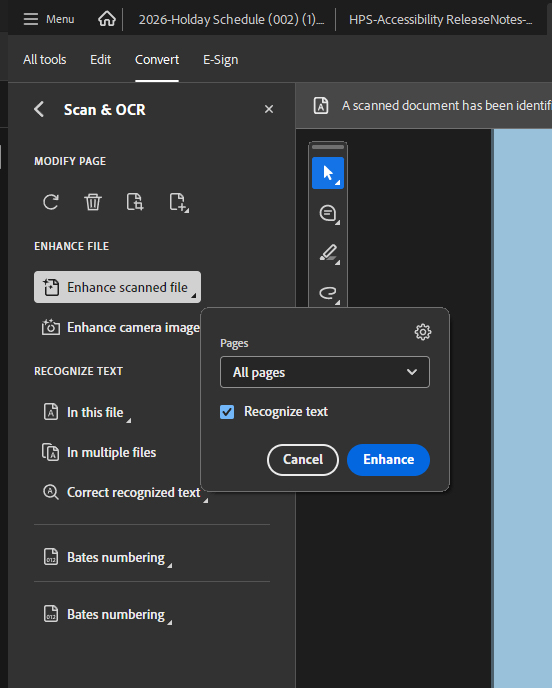
Enhance File > Enhance Scanned File, check the Recognize Text box, and click the Enhance button OR
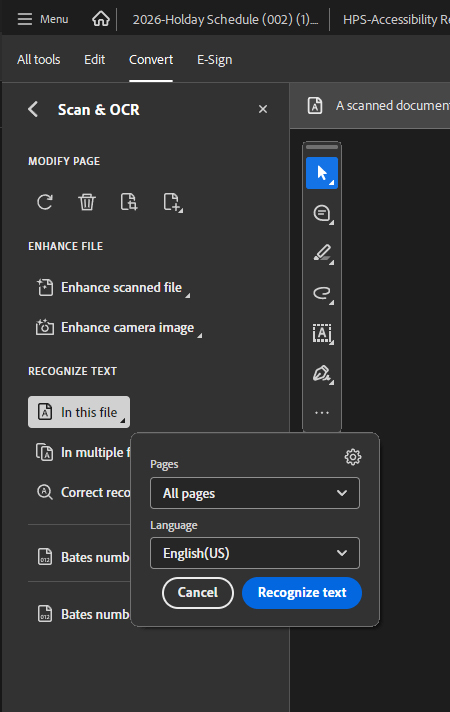
click on Recognize Text > In This File and click the Recognize Text
Both routes give you the same results.
- Manually check the enhanced file for the typical things, like the content layer, tag layer, and logical reading order of content.
Manually Typing the Content into the Content Layer.
You may notice that instead of detectable text in a document, particularly after an automated OCR, that the text in the Content panel is just not right. The source document might have been printed poorly with stretched type, the paper aged due to time, and the paper has stray pen marks on it, making it difficult for an OCR to be accurate. Instead of content listed in complete paragraphs, if may be scattered as individual words, missing words, or using inaccurate words. In this case, you will have to either clean up the OCR text heavily or forgo that and type in the text from scratch.
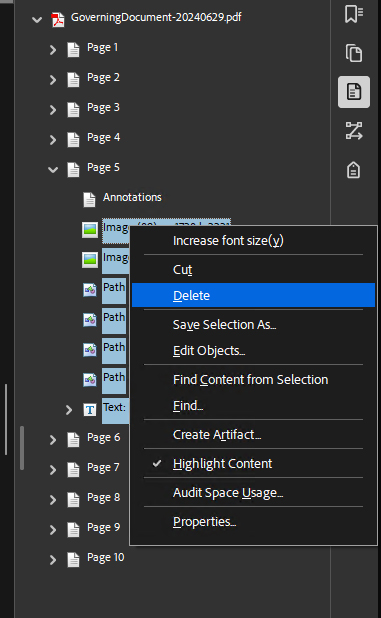
- Right-click to Delete the useless content data that may have been mis-detected.
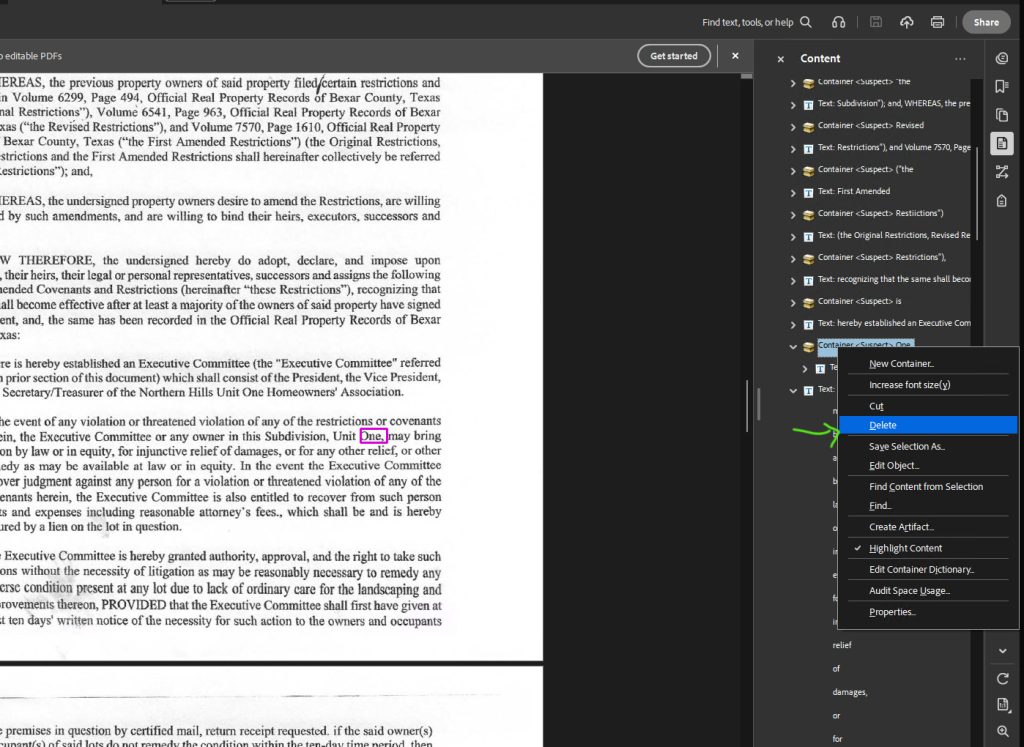
- Delete any scratch marks on the paper that may have been mis-detected as images: right-click the image and select Delete.
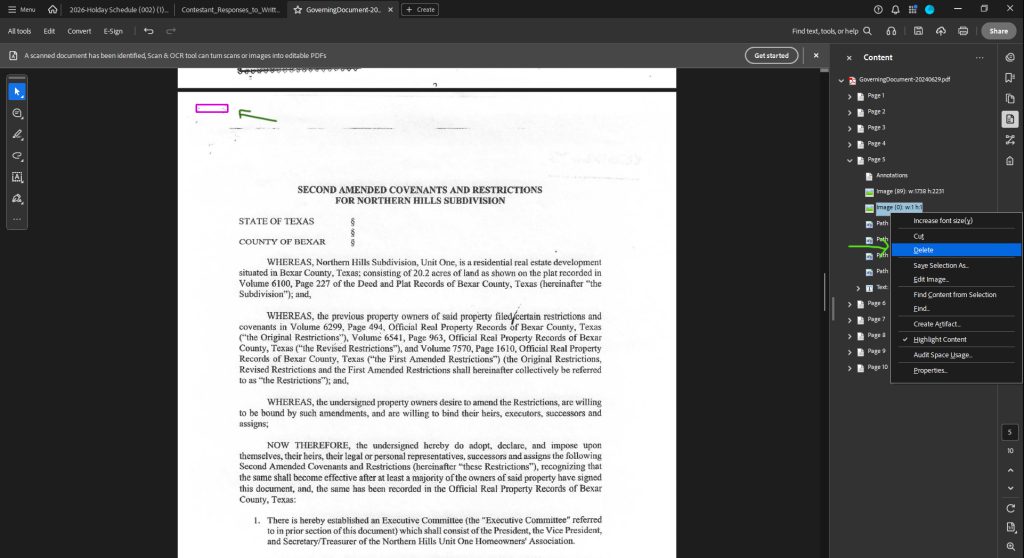
- Note: If you hold down Shift on your keyboard, and click 2 places in the content tree, you can bulk select many branches at once, and right-click to Delete the many items at once. You may alternatively hit the Delete key on your keyboard to delete the items.
- If a word is detected with an error, you can also double-click and re-type that word to correct the word.
- If a word is broken into 2 words, you can edit it to make a single word. Add the missing letters to one text item and delete the next text item.
What to Do Next?
PDF mediation can be a lot of work. It may not be financially feasible for all companies, but it may be required for companies that do business with the USA government. The larger your business is, the more at risk for accessibility liability you may be at. Here is where to go next:
- Open up your Word Documents that you use to generate your PDFs, and verify that the source content matches the advised styles. You can likely remediate most of the issues by using the standard Microsoft styling. While compliance is either “pass” or “fail,” you can quickly help a large portion of your user base with those quick fixes.
- Check with your vendors to see if their documents that they supply to you are compliant. (For example, if a vendor generates your ID cards, or plan documents, which are fed into your portal, verify that vendor is sending you compliant documents from the source.)
- If you aren’t up for the task, you can outsource the PDF remediation to a third party.
- You can potentially contract with a disability organization in your area to get real-life tests done by disabled people.
- If your PDFs are already remediated for 508 compliance, that is only one piece of the puzzle. You’ll also need a 508 compliant portal. Reach out to our sales team to get started on a custom branded, 508 compliant portal for you.